protected void navigate(Event event, URL fxmlDocName) throws IOException {
  //Loading new fxml UI document
  Parent pageParent = FXMLLoader.load(fxmlDocName);
  //Creating new scene
  Scene scene = new Scene(pageParent);
  //get current stage
  Stage appStage = (Stage)((Node) event.getSource()).getScene().getWindow();
  //Hide old stage
  appStage.hide(); // Optional
  //Set stage with new Scene
  appStage.setScene(scene);
  //Show up the stage
  appStage.show();
}Developing a note-taking application
Building an application for one platform just isn’t good enough anymore. Desktop, Web, mobile, and embedded support are all required for a successful product, but learning the different environments is difficult. Here comes into play the power of JavaFX to write an application that will run on different platforms with simple tweaks, as we will see in this chapter.
Here, we are going to build a note-taking application for desktop and the Web as well. In this project, I’ll show you how to create a complete JavaFX application from scratch using the JavaFX 8 SDK and the Java programming language using our previously installed developer tools (refer to Chapter 1, Getting Started with JavaFX 8).
I’ll then show you how to create the application’s two screen layouts and create the Java classes that control them. I’ll create buttons that control navigation between different scenes, saves data, and then gets your UI controls updated dynamically with the power of property bindings.
The final project will look like the following screenshot:
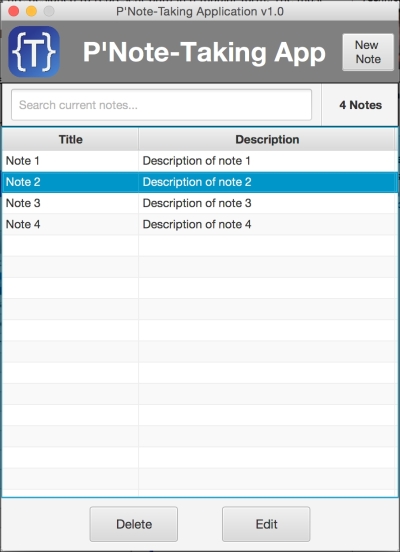
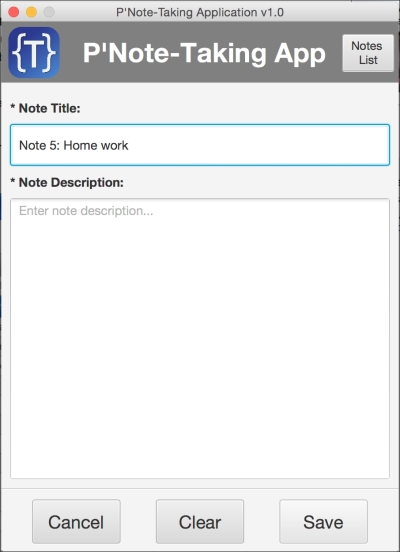
This figure shows the add and edit screen opened from the main screen new note button to add new note, or edit button to edit one of listed notes as the following:
Building the UI prototype
The first step in building any successful application with complex UI (even simple ones) is prototyping your layout, screens relationship, their state, and their navigation. Sketch it on a piece of paper and then get feedback from your team and manager. Rework it and, once approved, start building a real interactive prototype for your customers, in order to get their feedback for final production.
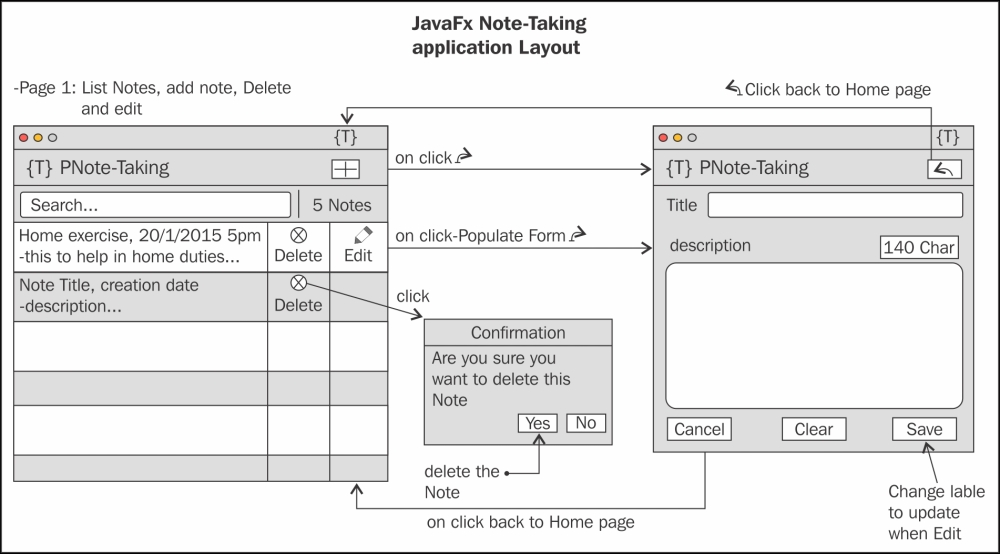
This is what we are going to do now, and our application has been laid out on piece of paper on any easy to use UI sketcher tools as in the following image. We will then develop it with the Scene Builder tool as a complete prototype.
In addition, we are going to see the interoperability between NetBeans and the Scene builder tool.
Note
Note that it is easier to sketch your layout by drawing it on paper first, as it is a very quick way to edit, enhance, and figure out the final application layout before interacting with the tools to develop it.
Now, as we have sketched our application, we are ready to build our application’s real prototype.
The best way to get the most out of the tools is to create your application skeleton (controller classes and FXML base page definitions) inside the NetBeans IDE, and then create and develop FXML pages inside the Scene builder tool. Here comes the powerful interoperability between the two tools.
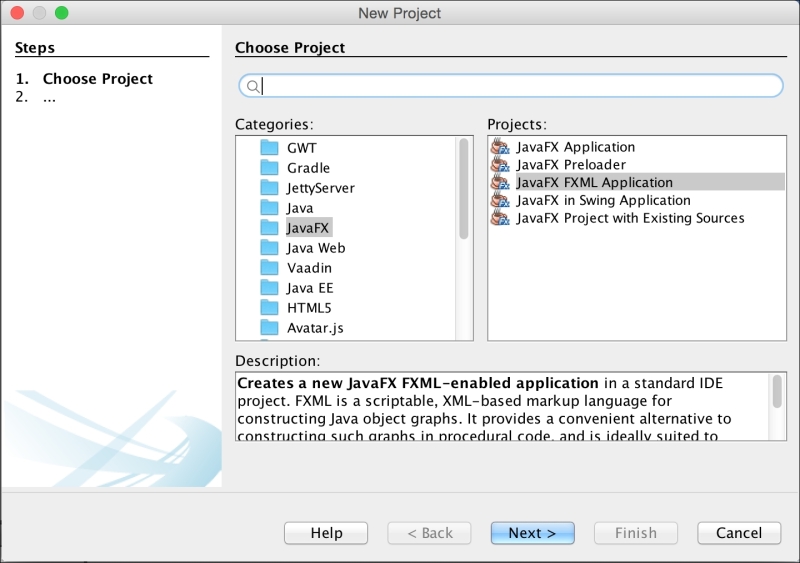
Here are the steps to start with JavaFX FXML application:
-
Open up the NetBeans IDE, and from the main menu, choose File, and then New Project a New Project dialog will open. From Categories, choose JavaFX, and then under Projects, choose JavaFX FXML Application. Then, click on the Next button:
-
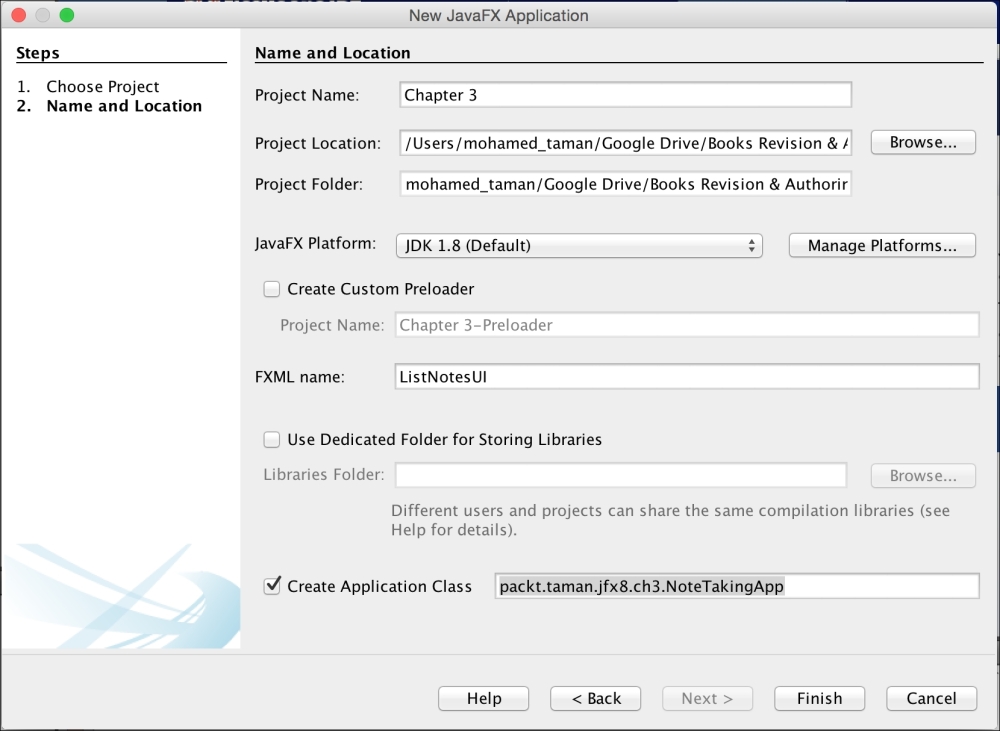
In the JavaFX FXML application dialog, add the relevant information. From Project name, add the location and FXML name (in my case, ListNotesUI). In Create Application class, I have added packt.taman.jfx8.ch3.NoteTakingApp, as shown in the following figure. Hit Finish.
-
Now we have a project with the first FXML UI document (ListNotesUI.fxml), and we need to add the second FXML UI document (AddEditUI.fxml) alongside its controller.
-
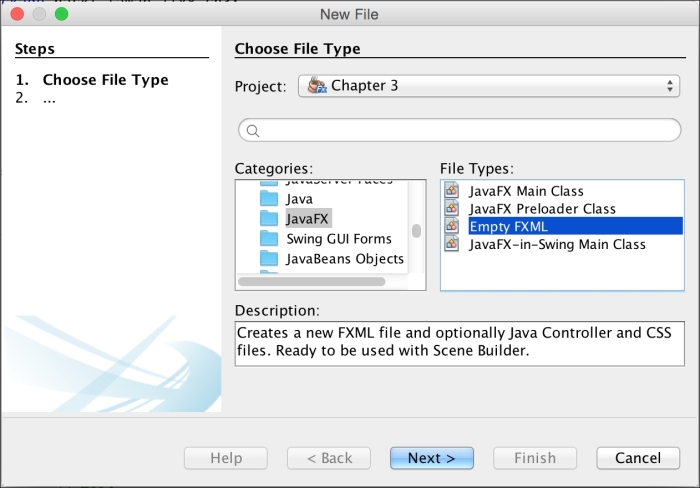
To do that from the file, choose New File; then, under the Categories list, choose JavaFX, and from the File Types list, choose Empty FXML, and finally, click on Next, as shown in the following figure.
-
In the New Empty FXML and Location dialog, edit the FXML Name field to be AddEditUI, and then click on Next.
-
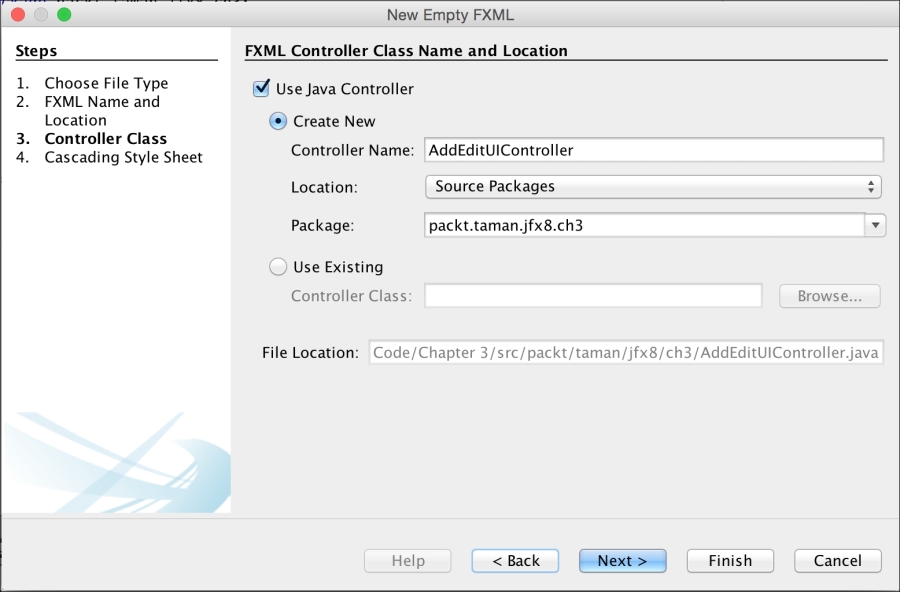
In the Controller Class dialog as in the following screen, tick the Use Java Controller checkbox. Make sure that Create New Controller has been selected, with the Controller Name as AddEditUIController. Then, click on Next, skip the Cascading Style Sheet dialog, and finally, click on Finish:
As we have built our project structure, it’s time to add our controls into our pages UI using Scene Builder, similar to what we sketched on paper. To do so is easy:
-
From NetBeans, right-click on ListNotesUI.fxml and select Open or just double-click on it. Scene Builder will open with your FXML document in design mode.
-
Design the page as per the following screenshot. Most importantly, don’t forget to save your changes before returning back to NetBeans or closing Scene Builder for logic implementation.
-
Perform the same steps for AddEditUI.fxml, and your design should end up like this:
You need to check the FXML document to see how we nested many containers and UI controls to achieve the desired UI we had sketched earlier, in addition to using their properties to control the spacing, alignment, font, and coloring.
Congratulations! You have converted your sketched layout to something vivid that could be presented as a project without logic to your team leaders and managers to get their feedback regarding colors, theming, and the final layout. Moreover, once it gets approved, you can proceed for the final customer feedback before diving deeper into the business logic.
Bringing your application to life – adding interactions
After designing your application, you need to bring it to life by making it more interactive and responsive to the functionality it is supposed to perform and act on the customer’s proposed functional requirement.
The first thing I always do is to add the navigation handler from page to page, and I have done that in each FXML document controller class.
To eliminate redundancy and be modular, I have created a base navigation method in the BaseController.java class, which will be extended by all controllers in the system. This class will be useful for adding any common functionality and shared attributes.
The following method, navigate(Event event, URL fxmlDocName), is one of the most important pieces of code that will be used in all of our system navigation (the comments illustrate the working mechanism):
This method will be called from the action handler of the New Note and edit button in the ListNotesUI.fxml page at ListNotesUIController.java and the List Notes, save, and Cancel buttons in the AddEditUI.fxml page at AddEditUIController.java as the following respectively.
Pay attention to the relationship between buttons defined in the FXML document and the controller. The @FXML annotation comes into play here to bind FXML attributes (using #) with the defined actions in the controller:
The New Note button definition in the ListNotesUI.fxml file is as follows:
<Button alignment="TOP_CENTER"
        contentDisplay="TEXT_ONLY"
        mnemonicParsing="false"
        onAction="#newNote"
        text="New Note"
        textAlignment="CENTER"
        wrapText="true"
/>
The New Note action is defined in ListNotesUIController.java, bound to the preceding button using onAction="#newNote":
@FXML
 private void newNote(ActionEvent event) throws IOException {
        editNote = null;
        navigate(event, ADD.getPage());
 }
The Back button definition in the AddEditUI.fxml file is as follows:
<Button alignment="TOP_CENTER"
        contentDisplay="TEXT_ONLY"
        mnemonicParsing="false"
        onAction="#back"
        text="Notes List"
        textAlignment="CENTER"
        wrapText="true"
/>
The Back action is defined in AddEditUIController.java, bound to the preceding button using onAction="#back":
@FXML
private void back(ActionEvent event) throws IOException {
        navigate(event, FXMLPage.LIST.getPage());
}
You may be wondering what the FXMLPage.java class does. It is an enum (for more about enums, visit https://docs.oracle.com/javase/tutorial/java/javaOO/enum.html). I have created enums to define all our FXML document names and their locations, in addition to any utility methods relevant to those FXML document, helping to ease coding in our system.
Tip
This concept of maintainability helps in large systems to maintain constant properties and functionality in one place for future ease of refactoring, and allows us to change names in one place instead of roaming all over the system to change just one name.
If you check system controllers, you will find all the logic for handling other button’s actions – deleting, editing, clearing, and saving notes.
Power application change synchronization with properties
Properties are wrapper objects for JavaFX-based object attributes such as String or Integer. Properties allow you to add listener code to respond when the wrapped value of an object has changed or is flagged as invalid. In addition, property objects can be bound to one another.
Binding behavior allows properties to update or synchronize their values based on a changed value from another property.
Properties are wrapper objects that have the ability to make values accessible as read/writable or read-only.
In short, JavaFX’s properties are wrapper objects holding actual values while providing change support, invalidation support, and binding capabilities. I will address binding later, but for now, let’s examine the commonly used property classes.
All wrapper property classes are located in the javafx.beans.property.* package namespace. Listed here are the commonly used property classes. To see all of the property classes, refer to the documentation in Javadoc (https://docs.oracle.com/javase/8/javafx/api/index.html?javafx/beans/property.html).
javafx.beans.property.SimpleBooleanProperty
javafx.beans.property.ReadOnlyBooleanWrapper
javafx.beans.property.SimpleIntegerProperty
javafx.beans.property.ReadOnlyIntegerWrapper
javafx.beans.property.SimpleDoubleProperty
javafx.beans.property.ReadOnlyDoubleWrapper
javafx.beans.property.SimpleStringProperty
javafx.beans.property.ReadOnlyStringWrapper
The properties that have a prefix of Simple and a suffix of Property are the read/writable property classes, and the classes with a prefix of ReadOnly and a suffix of Wrapper are the read-only properties. Later, you will see how to create a JavaFX bean using these commonly used properties.
Let’s fast-forward to JavaFX’s Properties API to see how it handles the common issues. You may notice that the TableView control has been added to the main page to list the currently loaded notes and any new added notes.
In order to populate TableView correctly with data, we should have a data model to represent the notes data, and this is the first place I used the Properties API in the JavaFX JavaBean-style Note class, which is defined as the following:
public class Note {
    private final SimpleStringProperty title;
    private final SimpleStringProperty description;
    public Note(String title, String description) {
        this.title = new SimpleStringProperty(title);
        this.description = new SimpleStringProperty(description);
    }
    public String getTitle() {
        return title.get();
    }
    public void setTitle(String title) {
        this.title.set(title);
    }
    public String getDescription() {
        return description.get();
    }
    public void setDescription(String description) {
        this.description.set(description);
    }
}
In order to populate the TableView class with data already stored in the application database, for example (our database here is transient using ObservableList<Note> of the note object called data), we have to pass a collection of this data.
We need to remove the burden of updating the UI control (in our case, the TableView control) manually each time the notes data collection get updated. Therefore, we need a solution to automatically synchronize the changes between the table view and notes data collection model, for example, adding, updating, or deleting data, without any further modification to the UI controls from the code. Only the data model collection gets updated – the UI should be synchronized automatically.
This feature is already an integral part of JavaFX collections. We will use JavaFX’s ObservableList class. The ObservableList class is a collection that is capable of notifying UI controls when objects are added, updated, or removed.
JavaFX’s ObservableList class is typically used in list UI controls, such as ListView and TableView. Let’s look at how we will use the ObservableList collection class.
In BaseController, I have created static data as ObservableList<Note> to be shared between all controllers, to be able to add, update, and remove notes from it. Also, it is initialized with some data as follows:
protected static ObservableList<Note> data = FXCollections.<Note>observableArrayList(
  new Note("Note 1", "Description of note 41"),
    new Note("Note 2", "Description of note 32"),
    new Note("Note 3", "Description of note 23"),
    new Note("Note 4", "Description of note 14"));
In the ListNotesUIController.java class, inside the initialize() method, I have created an instance of the javafx.collections.transformation.FilteredList class that will be used as the filtering class when we search in the table contents. It will pass the data object of type ObservableList<Note> as the source data:
FilteredList<Note> filteredData = new FilteredList<>(data, n -> true);The second argument of FilteredList is the predicate used to filter data; here, it returns true, meaning no filtration, and we will add the filtration predicate later on.
The created data list of type ObservableList<Note> should be passed to our TableView data in order for the table view to monitor the current data collection manipulations, such as addition, deletion, editing, and filtering, as the following in the initialize() method of the ListNotesUIController.java class, but instead we have passed the filteredData wrapper instance:
notesListTable.setItems(filteredData);The final step is to acknowledge our notesListTable columns, of type TableColumn, and to which property of Note class to render and take care of. We use the setCellValueFactory() method to do the trick, as shown here:
titleTc.setCellValueFactory(new PropertyValueFactory<>("title"));
descriptionTc.setCellValueFactory(new PropertyValueFactory<>("description"));
Note that title and description are the instance variable names of the Note class.
Check the final project code for the full implementation. Then, run the application from the NetBeans main menu, choose Run, and then click on Run Main Project.
Try to add a new note and watch the table view for your newly added note. Try to select and delete the note or update an existing note. You will notice the change immediately.
By checking the application code, you will see that all we have done is manipulated the data list and all the other synchronization work efforts are carried out with the help of the ObservableList class.
Filtering the TableView data list
We will get in touch here with two of the most powerful Java SE 8 and JavaFX 8 features Predicate and FilteredList. Let’s state the problem we have at hand and how we are going to solve it with the stream feature.
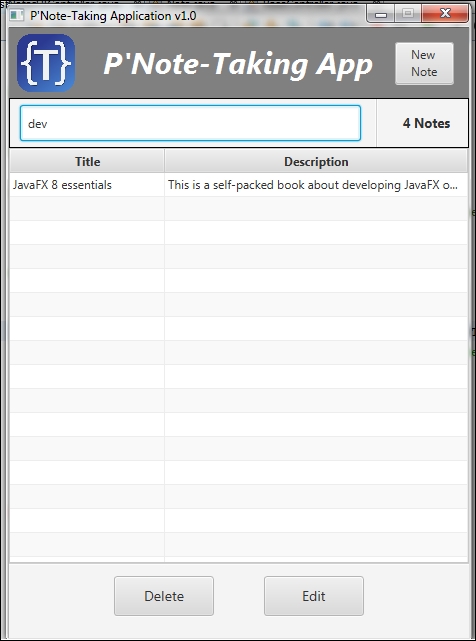
In our ListNotesUI.fxml page, you may notice the text field located above the notes table; its purpose here is to filter the current table data to narrow the result to get a specific note. Also, we need to maintain the current list being careful not to remove any data from it or query the database for each search hit.
We already have the notes data list and we are going to use the text field to filter this list for any note title or description containing this character or a combination of characters, as shown here:
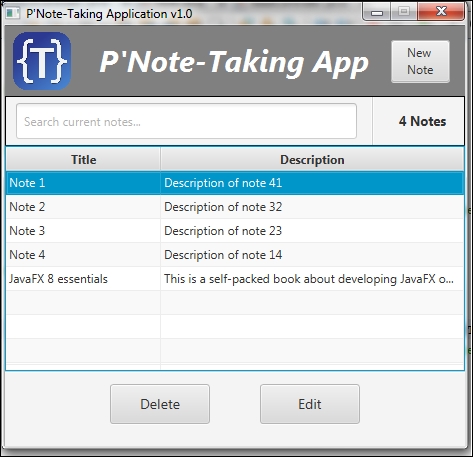
Now, after typing in d, de, dev, or developing, JavaFX, a table will be filtered, as seen in the following screenshot. Also, try to remove all the text; you will find that the data comes back again. Next, we will discover how we did that.
The following is the magical piece of code that did that:
searchNotes.setOnKeyReleased(e ->
{
  filteredData.setPredicate(n ->
  {
if (searchNotes.getText() == null || searchNotes.getText().isEmpty())
return true;

return n.getTitle().contains(searchNotes.getText())
|| n.getDescription().contains(searchNotes.getText());
  });
});
The searchNotes is a reference to the text field we are using to filter the notes data. We have registered it with a setOnKeyReleased(EventHandler<? super KeyEvent> value) method that gets our text to filter once any character is typed in. Also, note that we used the Lambda expression here to make the code more concise and clean.
Inside the definition of the action method, filteredData is a FilteredList<Note> class, we have passed a predicate test() method implementation to setPredicate(Predicate<? super E> predicate) filter only the notes title or a description matching the searchNotes text input.
The filtered data is automatically updated to the table UI.
For more information about the Predicate API, visit http://docs.oracle.com/javase/8/docs/api/java/util/function/Predicate.html.
Note-taking as a desktop application
Once you have finished the application, it will be more professional to not distribute the final jar and instead ask the user to install the JRE environment to be able to run your application, especially if you targeting a large audience.
It’s more professional to prepare your native installer packages as .exe, .msi, .dmg. or .img.
Every installer manages the application requirements from the required assets and runtime environments. This ensures that your application will run on multiple platforms too.
Deploying the application for desktop distribution One of the advanced NetBeans features is to allow you to bundle your application for different platforms via its deployment handler, which gives you the following main features:
-
Deploy your application through native installers
-
Manage application assets as application icons, splash screens, and native installer icons
-
Accept the certificate for the final signing of your application when preparing the final package
-
Manage the required JavaFX runtime version
-
Adding desktop shortcuts of the Start menu when using Windows
-
Handling the Java Web Start technology requirements and customizations