public class Question {

    private String owner;
    private String question;
    private long timestamp;

    public Question () {
    }
    public Question (String o, String q, long t) {
        this.owner = o;
        this.question = q;
        this.timestamp = t;
    }

    public String getOwner() {
        return owner;
    }

    public void setOwner(String owner) {
        this.owner = owner;
    }

    public String getQuestion() {
        return question;
    }

    public void setQuestion(String question) {
        this.question = question;
    }

    public long getTimestamp() {
        return timestamp;
    }

    public void setTimestamp(long timestamp) {
        this.timestamp = timestamp;
    }

}웹서비스 접근하기
Front-End and Back-End Platforms
FX가 프론트 엔드 플랫폼이다. JavaFX applications and Java enterprise applications must be exchanging data. 다음 두 가지 방법을 사용한다.
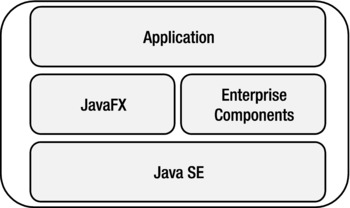
Fig. 11-1. JavaFX and enterprise components on a single system
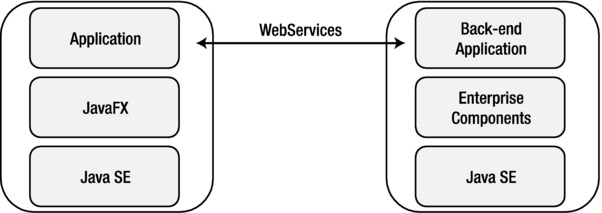
Fig.11-2 JavaFX application communicates with enterprise components on a remote server
It should also be stressed here that as long as a standard, well-defined protocol (e.g., SOAP/REST) is used, it is very possible to connect a JavaFX application to a non-Java back-end application. The decoupling between client and server indeed allows for different programming languages to be used on the client and on the server.
JavaFX와 Java Enterprise 모듈을 같은 환경에서 합치기
JavaFX 8은 자바 Standard Edition 위에 구축되어 있다. Enterprise 에디션 또한 Standard Edition 플랫폼 위에 구현되어 있다. JavaFX 개발자는 선호하는 enterprise 도구로 앱을 개발 할 수 있다. 이는 데이터베이스 자원과 트랜잭션을 가진 특정 도메인 레이어에서 개발하는 도구들을 사용하는 이점이 있다.
• Servlet 3.1 (JSR 340)
• JSF 2.2 (JSR 344)
• API for WebSocket 1.0 (JSR 356)
• API for JSON Processing 1.0 (JSR 353)
• Expression Language 3.0 (JSR 341)
• JSP 2.3 (JSR 245)
• JSTL 1.2 (JSR 52)
• Debugging Support for Other Languages 1.0 (JSR 45)
• API for RESTful Web Services (JAX-RS) 2.0 (JSR 339)
• API for XML-Based Web Services (JAX-WS) 2.2 (JSR 224)
• JAXB 2.2 (JSR 222)
• Implementing Enterprise Web Services 1.4 (JSR 109)
• Web Services Metadata for the Java Platform (JSR 181)
• API for XML-Based RPC (JAX-RPC) 1.1 (JSR 101)
• API for XML Registries (JAXR) 1.0 (JSR 93)
• JMS 2.0 (JSR 343)
• Batch Applications for the Java Platform 1.0 (JSR 352)
• Concurrency Utilities for Java EE 1.0 (JSR 236)
• Enterprise JavaBeans 3.2 (JSR 345)
• Bean Validation 1.1 (JSR 349)
• Persistence 2.1 (JSR 338)
• Contexts and Dependency Injection (CDI) for Java 1.1 (JSR 346)
• Dependency Injection for Java 1.0 (JSR 330)
• EE Connector Architecture 1.7 (JSR 322)
• Transaction API (JTA) 1.2 (JSR 907)
• Common Annotations (JSR 250)
• JavaMail 1.5 (JSR 919)
• Authentication Service Provider Interface for Containers 1.1 (JSR 196)
• Authorization Contract for Containers 1.5 (JSR 115)
• APIs for XML Messaging 1.3 (JSR 67)
• J2EE Management 1.1 (JSR 77)
• EE Application Deployment 1.2 (JSR 88)
Most of these individual JSRs are implemented by a number of companies, and implementations are often grouped into a product. Typical enterprise components implement one or more JSRs, and they might include additional product-specific functionality. Among the most popular enterprise components we count the Spring Framework, Tomcat/TomEE, Hibernate, JBoss/WildFly, RestEasy, and GlassFish. A number of products implement all JSRs, and those products are then called implementations of the Java Platform, Enterprise Edition, often referred to as Java EE Platforms.
Technically, there are no restrictions in the JavaFX platform that prevent Java enterprise components from being used. 하지만 엔터프라이즈 개발과 클라이언트 개발은 여러모에서 다르다.
-
엔터프라이즈 인프라가 클라우드로 이동하고 있다. 특정 업무들이(e.g., storage, mail, etc.) 클라우드 방식으로 아웃소싱된다. Enterprise servers are often located in a cloud environment, allowing fast and seamless interaction with cloud components.
-
In terms of resource requirements, enterprise systems focus on computing resources (CPU, cache, and memory) where desktop computers and laptops focus instead on visual resources (e.g., graphical hardware acceleration).
-
스타트업 시간은 서버에서 이슈가 되는 경우는 거의 없지만 데스크탑에서는 문제가 된다. 또한 서버는 24시간/7일 동안 실행되야 하지만 클라이언트는 그럴 필요가 없다.
-
개발과 라이프사이클 관리가 서버제품이나 클라이언트 제품에 맞추어져 있다. 서버나 서버 소프트웨어를 업그레이드 하는 것은 긴 작업이다. 다운타임이 최소화 되어야 한다. 클라이언트가 서버에 물려있기 때문이다. 클라이언트 프로그램의 배포는 단독방식, self-contained applications or Java Network Launch Protocol (JNLP)으로 할 수 있다.
-
엔터프라이즈 개발이 여러가지 패턴((e.g., Inversion of Control, container-based initialization)을 사용하고 있고 클라이언트 개발에서도 유용하지만 전통적인 클라이언트와 다른 아키텍처를 요구한다.
JavaFX로 원격 웹서비스 호출
엔터프라이즈 컴포넌트는 웹 자원을 통해 액세스 할 수 있다. 어떤 명세는 웹기반 프레임워크가 엔터프라이즈 컴포넌트와 상호반응하여 렌더링 정보를 기술하는지 정확히 기술하고 있다. 하지만 엔터프라이즈 컴포넌트(자바 또는 다른 언어로 작성한)가 웹이 아닌 자원으로부터도 액세스를 허용한다. 이러한 명세는 엔터프라이즈 개발과 어떠한 다른 개발과 분리시키며 여러 중요 참여자들에 의해 정의된다.
1988년에 SOAP이 Microsoft가 제안하여 자바와 닷넷간의 데이터 교환에 사용하였다. SOAP은 XML 기반으로서 2003년에 W3의 제안이 되었다.
SOAP이 강력하면서 비교적 가독성이 좋으나 좀 단어가 많아진다. 특정 기능을 제공하는 매쉬업이나 간단한 서비스의 등장으로 새로운 아키텍처 스타일이 부상한다. REST는 서버와 클라이언트 개발자간에 느슨한 결합으로 XML, JSON, Atom 또는 기타 포맷을 지원하는 streamline방식으로 데이터를 교환할 수 있다.
SOAP
A number of Enterprise applications use SOAP at the back end, and thus require SOAP to be supported on the client as well. Fortunately, SOAP is supported in Java. The examples in this chapter use the REST protocol inasmuch as this is more comprehensive, but using the javax.xml.soap package is perfectly possible in JavaFX applications, because this package is available in the Java Platform, Standard Edition 8.
REST
REST-based web services can be accessed using standard HTTP technologies, and the Java Platform comes with a number of APIs (mainly in java.io and java.net) that facilitate access to REST-based web services.
One of the major advantages of JavaFX being written on top of the Java Platform, Standard Edition 8, is the ability to use all of these APIs in JavaFX applications. This is what we do in the first examples in this chapter. We show how we can use Java APIs for consuming REST-based web services and how we can integrate the result in a JavaFX application.
Next, we show how to leverage the JavaFX APIs to avoid common pitfalls (e.g., unresponsive applications, no dynamic update, etc.). Finally, we give a brief overview of third-party libraries that make it easy for JavaFX developers to access REST-based web services.
애플리케이션 설정
먼저 샘플 작성을 위한 프레임워크를 만든다. Stack Exchange에서 제공하는 API를 사용할 것이다. Stack Exchange는 각 주제별 포럼들을 모아 놓은 곳으로 질문과 답으로 이루어져 있다. 자바 개발자는 대개 StackOverflow에 친숙할 것이다. 이 사이트는 Stack Exchange의 첫번째 사이트이다.
The REST APIs provided by StackExchange are very well described at https://api.stackexchange.com. It is not our goal to explore all the possibilities offered by StackExchange and the corresponding APIs, so the interested reader is referred to the documentation available on the web site.
이 장의 샘플에서는 질문자, 질문 제목과 질문한 날짜를 보여줄 것이다.
Initially, we represent a question by a Java Object with getters and setters. This is shown in Listing 11-1.
Listing 11-1. Question Class
Our Question class has two constructors. The zero-arg constructor is needed in one of the following examples and we come back to this later. The constructor that takes three arguments is used for convenience in other examples.
In Listing 11-2, we show how to display questions. In this first example, the questions are not obtained via the StackExchange API, but they are hard-coded in the example.
public class StackOverflowApp1 extends Application {

    public static void main(String[] args) {
        launch(args);
    }

    @Override
    public void start(Stage primaryStage) {
        ListView<Question> listView = new ListView<>();
        listView.setItems(getObservableList());
        StackPane root = new StackPane();
        root.getChildren().add(listView);

        Scene scene = new Scene(root, 500, 300);
        primaryStage.setTitle("StackOverflow List");
        primaryStage.setScene(scene);
        primaryStage.show();
    }

    ObservableList<Question> getObservableList() {
        ObservableList<Question> answer = FXCollections.observableArrayList();
        long now = System.currentTimeMillis();
        long yesterday = now - 1000 * 60 * 60 * 24;
        Question q1 = new Question("James", "How can I call a REST service?", now);
        Question q2 = new Question("Stephen", "Does JavaFX work on Android?", yesterday);
        answer.addAll(q1, q2);
        return answer;
    }
}
ListView을 만들어 StackPane에 넣고 Scene을 만들어 Stage가 그리도록 한다.
ListView는 질문을 들어 있는 ObservableList로 채워진다. 다음 샘플에서는 이 메소드를 수정하여 StackExchange API의 질문을 꺼내올 것이다.
In Listing 11-3, we create a QuestionCell class that extends ListCell and defines how to lay out a cell.
Listing 11-3. Define QuestionCell
 public class QuestionCell extends ListCell<Question> {

    static final SimpleDateFormat sdf = new SimpleDateFormat ("dd-MM-YY");
    @Override
    protected void updateItem(Question question, boolean empty){
        super.updateItem(question, empty);
        if (empty) {
            setText("");
        } else {
            StringBuilder sb= new StringBuilder();
            sb.append("[")
            .append(sdf.format(new Date(question.getTimestamp())))
            .append("]")
            .append(" ")
            .append(question.getOwner()+": " + question.getQuestion());

            setText(sb.toString());
        }
    }
 }
셀 항목이 갱신되면, 저작자와 제목, 각괄호에 있는 timestamp를 포함하는 텍스트를 보여주라고 한다. 다음에 LivetView는 QustionCell을 그리라고 얘기해줘야 한다. 그렇게 하기 위해 ListView.setCellFactory()를 부르고 람다식에서 새로운 QuestionCell()을 만들도록 한다. In Listing 11-4, we show the modified version of the start method of our StackOverflowApplication.
Listing 11-4. Use CellFactory on the ListView
 public void start(Stage primaryStage) {
    ListView<Question> listView = new ListView<>();
    listView.setItems(getObservableList());
    listView.setCellFactory(l -> new QuestionCell());

    StackPane root = new StackPane();
    root.getChildren().add(listView);

    Scene scene = new Scene(root, 500, 300);

    primaryStage.setTitle("StackOverflow List");
    primaryStage.setScene(scene);
    primaryStage.show();
 }
For every question that is in the items of the ListView, the output is now what we expected it to be. We can do a lot more with CellFactories (e.g., we can use graphics instead of just text), but that is beyond the scope of this chapter.
이제 질문을 StackExchange API를 통해 가져와 보자.
Using the StackExchange API
Stack Exchange 네트워크는 타 개발자가 REST 기반 인터페이스를 사용하여 질문과 답을 액세스하도록 하였다. StackExchange에는 여러 API들이 있지만 이번에는 Search API를 사용하도록 할 것이다.
REST API의 종단점인 리소스 URL은 매우 단순하다.
http://api.stackexchange.com/2.2/search여러가지 쿼리 매개변수를 사용할 수 있다. 여기서는 두 가지만 사용키로 한다.
• Site: 찾고자하는 도메인을 지정. in our case this is “stackoverflow.”
• tagged: 세미콜론으로 분리된 태그 리스트. We want to search all questions tagged with “javafx.”
Combining both parameters leads to the following REST call:
http://api.stackexchange.com/2.2/search?tagged=javafx&site=stackoverflowREST를 브라우저나 curl에서는 다음과 같이 json 텍스트로 보인다.
{
  "items": [
    {
      "tags": [
        "java",
        "sorting",
        "javafx",
        "tableview"
      ],
      "owner": {
        "reputation": 132,
        "user_id":578518,
        "user_type": "registered",
        "accept_rate": 84,
        "profile_image":"https://www.gravatar.com/avatar/bdbee99c377a7063b24e09e7121fb1ab?s=128&d=identicon&r=PG",
        "display_name": "Rps",
        "link":"http://stackoverflow.com/users/578518/rps"
      },
      "is_answered": false,
      "view_count": 7,
      "answer_count": 1,
      "score": 0,
      "last_activity_date": 1397845222,
      "creation_date": 1397844823,
      "last_edit_date": 1397845143,
      "question_id":23159737,
      "link":"http://stackoverflow.com/questions/23159737/javafx-tableview-ordered-by-date",
      "title": "javafx Tableview ordered by date"
    },

...
,"has_more":true
,"quota_max":300,
"quota_remaining":290
}
StackExchange는 JSON으로만 응답을 제공한다. XML 응답을 처리하는 방법을 보여주기 위해서 우리가 만든 XML기반 출력을 만들것이다. 외부의 REST 종단점을 부르는 대신 이 XML응답은 로컬 파일에서 읽어서 만든다.
Our self-defined XML response is shown in Listing 11-6.
Listing 11-6.  Artificial XML Response Obtained from the StackExchange Search API
<?xml version="1.0" encoding="UTF-8"?>

<items>
  <item>
    <tags>
      <tag>java</tag>
      <tag>sorting</tag>
      <tag>javafx</tag>
      <tag>tableview</tag>
    </tags>
    <owner>Rps</owner>
    <creation_date>1397844823</creation_date>
    <title>javafx Tableview ordered by date</title>
  <item>
</items>
JSON Response Format
JSON is a very popular format on the Internet, especially in web applications where incoming data are parsed with JavaScript. JSON data are rather compact and more or less human readable.
2013년 Java 엔터프라이즈 에디션 7이 발표되면서 JSON의 읽기와 쓰기에 대한 표준 명세가 제공된다. 이 자바 사양은 JSR 353에서 정의한다. and more information can be obtained at http://www.jcp.org/en/jsr/detail?id=353.
JSR353은 사양을 정의한 것이다. 실제 구현은 아직 개발 작업이 필요하다. 여기서는 jsonp를 사용한다. 이 참조 구현은 https://jsonp.java.net/.에서 얻을 수 있다.
Although JSR 353 is a specification that is part of the Java Enterprise Edition umbrella, the reference implementation also works in a Java Standard Edition environment. There are no external dependencies.
We now replace the hard-coded list containing two fake questions with real questions obtained via the StackExchange REST API. We keep the existing code, but we modify the getObservableList() method as shown in Listing 11-7.
Listing 11-7. Obtain Questions Via the StackExchange REST API, JSON Format and Parse the JSON
ObservableList<Question> getObservableList() throws IOException {
    String url = "http://api.stackexchange.com/2.2/search?tagged=javafx&site=stackoverflow";
    URL host = new URL(url);
    JsonReader jr = Json.createReader(new GZIPInputStream(host.openConnection().getInputStream()));

    JsonObject jsonObject = jr.readObject();
    JsonArray jsonArray = jsonObject.getJsonArray("items");
    ObservableList<Question> answer = FXCollections.observableArrayList();

    jsonArray.iterator().forEachRemaining((JsonValue e) -> {
        JsonObject obj = (JsonObject) e;
        JsonString name = obj.getJsonObject("owner").getJsonString("display_name");
        JsonString quest = obj.getJsonString("title");
        JsonNumber jsonNumber = obj.getJsonNumber("creation_date");
        Question q = new Question(name.getString(), quest.getString(), jsonNumber.longValue() * 1000);
        answer.add(q);
    });
    return answer;
}
The code in Listing 11-7 can be divided into four parts:
-
REST 종단점을 호출.
-
JSON 데이터를 읽음.
-
각 아이템을 질문으로 바꿈.
-
질문을 결과에 넣음.
Calling the REST endpoint is very straightforward:
String url = "http://api.stackexchange.com/2.2/search?tagged=javafx&site=stackoverflow";
URL host = new URL(url);
JsonReader jr = Json.createReader(new GZIPInputStream(host.openConnection().getInputStream()));
First, we create a URL Object that refers to the desired location. Next, we open the connection to the location.
StackExchange는 zip으로 압축하여 데이터를 보내므르 우리는 GZIPInputStream을 으로부터 데이터를 읽는다.
이제 우리가 원하는 데이터를 처리하는 JSON 리더를 갖게되었다. 이 JSON 리더로부터 자바 객체를 추출하려면 특정 케이스에 대한 특정 코드를 작성해야 한다.
Listing 11-5을 보면, 각 괄호에 있는 항목은 배열에 있는 질문들이므로 JSON 배열은 다음 문장으로 읽는다.
JsonArray jsonArray = jsonObject.getJsonArray("items");다음에는 각 원소들을 순회하면서 질문을 만들어 낸다.
Iterating over the array elements can be done using
jsonArray.iterator().forEachRemaining((JsonValue e) -> {
    ...
}
XML Response Format
The XML format is widely used in the Java platform. As a consequence, standardization of XML-based operations in Java happened years ago. There are a number of XML tools built into the Java Platform, Standard Edition, and we can use these APIs and tools in JavaFX without any external dependency. In this section, we first use a DOM processor for parsing the XML response that we artificially built. Next, we use the JAXB standard to automatically obtain Java Objects.
Changing our application from JSON input to XML input requires only the getObservableList method to be changed. The new implementation is shown in Listing 11-8.
Listing 11-8. Obtaining Questions from the XML-Based Response
ObservableList<Question> getObservableList() throws IOException, ParserConfigurationException, SAXException {
        ObservableList<Question> answer = FXCollections.observableArrayList();
        InputStream inputStream = this.getClass().getResourceAsStream("/stackoverflow.xml");
        DocumentBuilderFactory dbf = DocumentBuilderFactory.newInstance();
        DocumentBuilder db = dbf.newDocumentBuilder();
        Document doc = db.parse(inputStream);
        NodeList questionNodes = doc.getElementsByTagName("item");
        int count = questionNodes.getLength();
        for (int i = 0; i < count; i++) {
            Question question = new Question();
            Element questionNode = (Element) questionNodes.item(i);

            NodeList childNodes = questionNode.getChildNodes();
            int cnt2 = childNodes.getLength();
            for (int j = 0; j < cnt2; j++) {
                 Node me = childNodes.item(j);
                 String nodeName = me.getNodeName();
                 if ("creation_date".equals(nodeName)) {
                     question.setTimestamp(Long.parseLong(me.getTextContent()));
                 }
                 if ("owner".equals(nodeName)) {
                     question.setOwner(me.getTextContent());
                 }
                 if ("title".equals(nodeName)) {
                     question.setQuestion(me.getTextContent());
                 }
        }
        answer.add(question);
    }
    return answer;

}
비동기 처리
이제까지의 예제에서 문제점이라면 데이터를 읽고 처리하는 동안 UI를 블로킹하는 것이다. 실제 상황에서 이것은 받아들일 수 없다. 외부의 웹서시스는 네트워크나 서버 이슈등으로 시간이 더 걸릴 수 있다. 외부 호출이 빠르다고 해도 UI가 잠시라도 멈칫거리면 앱의 전체적인 품질이 낮아진다.
다행히 자바FX 플랫폼은 동시성과 비동기 태스트를 지원한다. Task, Worker, Service 개념은 7장에서 다루었다. 이 장에서는 javafx.concurrent 패키지를 활용하여 웹서비스를 액세스하는 것을 보여준다. 또한 ListView가 그의 항목을 담고 있는 ObservableList를 감시하고 있다는 사실도 활용할 것이다.
기본적인 아이디어는 ListView를 만들때 우리는 즉시 비어 있는 ObservableList를 반환하고 백그라운드 Thread에서 데이터를 꺼내도록 한다. 데이터를 꺼내어 파싱하면 이를 ObservableList에 넣으면 즉시 ListView에서 보인디ㅏ.
The main class for this example is shown in Listing 11-13. We started with the code in Listing 11-7, where we obtained the questions in JSON format using a REST request to the StackExchange API. With some minor modifications, we could use the XML response as well, though.
Listing 11-13. Use a Background Thread for Retrieving Question ListView.
public class StackOverflow extends Application {

    @Override
    public void start(Stage primaryStage) throws IOException {
        ListView<Question> listView = new ListView<>();
        listView.setItems(getObservableList());
        listView.setCellFactory(l -> new QuestionCell());
        StackPane root = new StackPane();
        root.getChildren().add(listView);

        Scene scene = new Scene(root, 500, 300);

        primaryStage.setTitle("StackOverflow List");
        primaryStage.setScene(scene);
        primaryStage.show();
        System.out.println (« Done with the setup ») ;
    }

    ObservableList<Question> getObservableList() throws IOException {
        String url = "http://api.stackexchange.com/2.2/search?order=desc&sort=activity&tagged=javafx&site=stackoverflow";
        Service<ObservableList<Question>>service = new QuestionRetrievalService(url);

        ObservableList<Question> answer = FXCollections.observableArrayList();
        service.stateProperty().addListener(new InvalidationListener() {

            @Override
            public void invalidated(Observable observable) {
                System.out.println("value is now "+service.getState());
                if (service.getState().equals(Worker.State.SUCCEEDED)) {
                    answer.addAll(service.getValue());
                }
            }
        });
        System.out.println("START SERVICE = "+service.getTitle());
        service.start();
        return answer;
    }

    /**
     * @param args the command line arguments
     */
    public static void main(String[] args) {
        launch(args);
    }
}
main은 이전 예제와 다르지 않다.
getObservableList메소드는 먼저 ObservableList 인스턴스를 만든다. 처음에는 이 인스터스에 항목이 없다. 이 메소드에서는 QuestionRetrievalService를 만들고 생성자에 REST 종단점을 인자로 넣는다. QuestionRetrievalService는 javafx.concurrent.Service를 상속한 것으로서 서비스의 상태가 변경되는 것을 listen한다. 서비스 상태가 State.SUCCEEDED로 바뀌면 꺼낸 질문을 ObservableList에 넣는다. QuestionRetrievalService 인스턴스의 모든 상태 변경이 로그로 출력된다.
QuestionRetrievalService를 자세히 들여다 보면서 Thread를 구동하고 꺼낸 질문을 ListView 콘트롤에 넣은 방법에 대해 이해하자.
Listing 11-14. QuestionRetrievalService
public class QuestionRetrievalService extends Service<ObservableList<Question>> {

    private String loc;

    public QuestionRetrievalService(String loc) {
        this.loc = loc;
    }

    @Override
    protected Task<ObservableList<Question>>createTask() {
        return new Task<ObservableList<Question>>() {

            @Override
            protected ObservableList<Question> call() throws Exception {
                URL host = new URL(loc);
                JsonReader jr = Json.createReader(new GZIPInputStream(host.openConnection().getInputStream()));

                JsonObject jsonObject = jr.readObject();
                JsonArray jsonArray = jsonObject.getJsonArray("items");
                ObservableList<Question> answer = FXCollections.observableArrayList();

                jsonArray.iterator().forEachRemaining((JsonValue e) -> {
                    JsonObject obj = (JsonObject) e;
                    JsonString name = obj.getJsonObject("owner").getJsonString("display_name");
                    JsonString quest = obj.getJsonString("title");
                    JsonNumber jsonNumber = obj.getJsonNumber("creation_date");
                    Question q = new Question(name.getString(), quest.getString(), jsonNumber.longValue() * 1000);
                    System.out.println("Adding question "+q);
                    answer.add(q);
                });
                return answer;
            }
        };
    }

}
QuestionRetrievalService는 Service를 확장한 것으로서 createTask를 구현하면 된다. 서비스가 시작되면 이 태스크는 별도의 Thread에서 실행된다, createTask는 새로운 태스크를 만들어 리턴한다. 이 메소드의 시그니처는
Task<ObservableList<Question>>createTask(),Task는 질문을 담을 수 있는 ObservableList를 만든다. 제너릭 타입의 매개변수는 서비스의 선언에 있는 타입 인자와 같다.
실제로 다음 코드는 uestionRetrievalService.getValue()가 ObservableList<Question>을 리턴하여야 함을 나타낸다.
ObservableList<Question> answer = FXCollections.observableArrayList();
...
    if (now == State.SUCCEEDED) {
        answer.addAll(service.getValue());
    }
QuestionRetrievalService에서 만든 Task 인스턴스는 call 메소드를 구현해야 한다. 이 메소드는 앞의 예제에서 getObservableList메소드가 한 일을 실제로 수행한다.
서비스(createTask에서 만든 Task)에서의 실제 작업이 백그라운드 Thread에서 이뤄지더라도 Service의 모든 메소드는 Thread로부터 액세스되어야 한다. 내부적인 구현을 통해 서비스에서 가용한 프로퍼티에 대한 모든 변경은 Thread에서 실행된다.
Running the example gives the exact same visual output as running the previous example. However, we added some System.out messages for clarity. If we run the example, the following messages can be seen on the console.
State of service is READY
State of service is SCHEDULED
Done with the setup
State of service is RUNNING
Adding question projavafx.Question@482fb3d5
...
Adding question projavafx.Question@2d622bf7
State of service is SUCCEEDED
This shows that the getObservableList method returns before the questions are obtained and added to the list.
웹서비스 데이터를 TableView로 전환하기
We can show the Question data in a TableView as well, and that is what we do in this section. The retrieval and parsing of the data stay the same as in the previous example. However, we now use a TableView to render the data, and we have to define which columns we want to see. For each column, we have to specify the origination of the data. The code in Listing 11-15 shows the start method used in the example.
Listing 11-15. The Start Method in the Application Rendering Questions in a TableView
	String getTimeStampString(long timestamp) {
		return new SimpleDateFormat("yyyy.MM.dd/HH.mm.ss").format(new Date(timestamp));
	}

   @Override
   public void start(Stage primaryStage) throws IOException {
       TableView<Question> tableView = new TableView<>();
       tableView.setItems(getObservableList());
       TableColumn<Question, String> dateColumn = new TableColumn<>("Date");
       TableColumn<Question, String> ownerColumn = new TableColumn<>("Owner");
       TableColumn<Question, String> questionColumn = new TableColumn<>("Question");
       dateColumn.setCellValueFactory((CellDataFeatures<Question, String> cdf) -> {
           Question q = cdf.getValue();
           return new SimpleStringProperty(getTimeStampString(q.getTimestamp()));
       });
       ownerColumn.setCellValueFactory((CellDataFeatures<Question, String> cdf) -> {
           Question q = cdf.getValue();
           return new SimpleStringProperty(q.getOwner());
       });
       questionColumn.setCellValueFactory((CellDataFeatures<Question, String> cdf) -> {
           Question q = cdf.getValue();
           return new SimpleStringProperty(q.getQuestion());
       });
       questionColumn.setPrefWidth(350);
       tableView.getColumns().addAll(dateColumn, ownerColumn, questionColumn);
       StackPane root = new StackPane();
       root.getChildren().add(tableView);

       Scene scene = new Scene(root, 500, 300);

       primaryStage.setTitle("StackOverflow Table");
       primaryStage.setScene(scene);
       primaryStage.show();
   }
이 코드는 앞에 코드에 비해 단순하다. 다음 코드를
dateColumn.setCellValueFactory((CellDataFeatures<Question, String> cdf) -> {
    Question q = cdf.getValue();
    return new SimpleStringProperty(getTimeStampString(q.getTimestamp()));
});
아래와 같이 바꾸었다.
dateColumn.setCellValueFactory(new PropertyValueFactory<>("timestampString"));ownerColumn과 questionColumn도 마찬가지이다.
우리는 javafx.scene.control.cell.PropertyValueFactory<S,T>(String name) 인스턴스로 셀에 표시할 특정 데이터를 정의하였다.
The PropertyValueFactory는 특정한 이름의 프로퍼티를 찾아서 이 프로퍼티의 ObservableValue를 리턴한다. 찾는 이름이 없는 경우 JavaDoc은 다음과 같이 설명한다.
이 예제에서 "firstName" 스트링은 Person 클래스 타입(TableView 항목 리스트의 클래스 타입)의 fisstNameProperty() 메소드를 가정한 레퍼런스로 사용된다. 또한 이 메소드는 Property인스턴스를 리턴한다. 이러한 요구에 맞는 메소드가 있으면 TableCell이 이 ObservableValue 값으로 채워진다. 또한 TableView는 리턴한 값에 자동으로 관찰자를 넣어서 발생한 어떤 변경도 TableView가 알도록 함으로 cell이 즉시 갱신되도록 한다.
이 패턴에 맞는 메소드가 없으면 get<property>() 또는 is<property>() 호출을 시도하기 위한 fall-through 지원이 있다. 이 패턴에 맞는 메소드가 있으면 이 메소드로부터 반환된 값은 ReadOnlyObjectWrapper로 감싸서 TableCell에게 반환된다. 하지만 이 상황에서는 TableCell이 변경에 대한 ObservableValue를 감지할 수 없다.
이것을 보면, JavaFX 프로퍼티가 TableView에 정보를 표현하기에 좋은 방식임을 분명히 알 수 있다. 이제까지는 POJO Question 클래스를 사용하여 ListView와 TableView 모두에 사용하였다.
앞의 예제가 JavaFX 프로퍼티 없이도 작동하지만 이제는 Question 클래스에 JavaFX 프로퍼티로 지은이 정보를 나타낼 것이다. timeStamp와 text 필드도 수정할 수 있으나 혼합 사용한 예제를 통해 fall-through 시나리오가 실제로 작동하는 것을 보여주려고 한다.
@XmlAccessorType(XmlAccessType.PROPERTY)
public class Question {

    static final SimpleDateFormat sdf = new SimpleDateFormat ("dd-MM-YY");

    private StringProperty ownerProperty = new SimpleStringProperty();
    private String question;
    private long timestamp;

    public Question (String o, String q, long t) {
        this.ownerProperty.set(o);
        this.question = q;
        this.timestamp = t;
    }

    public String getOwner() {
        return ownerProperty.get();
    }

    public void setOwner(String owner) {
        this.ownerProperty.set(owner);
    }

    public String getQuestion() {
        return question;
    }

    public void setQuestion(String question) {
        this.question = question;
    }

    public long getTimestamp() {
        return timestamp;
    }

    public void setTimestamp(long timestamp) {
        this.timestamp = timestamp;
    }

    public String getTimestampString() {
        return sdf.format(new Date(timestamp));
    }

}
ownerProperty는 표준 JavaFX 규약을 따른다. 이 클래스는 @XmlAccessorType(XmlAccessType.PROPERTY)으로 애노테이션되어 있다.
그 이유는 Questiond을 생성할 때 그의 setter가 JAXB.unmarshal메소드에서 불려지기 때문이다. JavaFX 프로퍼티를 사용할 경우에 요구된다. JAXB 프레임워크는 XML 원소 "owner" 값을 String 필드에 지정할 수 있지만 프로퍼티에 값을 지정할 수는 없다.
XmlAccessType.PROPERTY를 사용하면 setOwner(String v) 메소드는 JAXB 프레임워크가 호출하면서 setOwner메소드에 XML Element값을 넣어준다.
ownerProperty.set(owner);will then update the JavaFX Property that is subsequently being used by the TableColumn and the TableView.
The other important change in the Question implementation is that we added a method
String getTimestampString()This method will return the timestamp in a human-readable format. You might have noticed in Listing 11-16 that we set the CellValueFactory for the dateColumn to a PropertyValueFactory that points to “timestampString” rather than “timeStamp”: dateColumn.setCellValueFactory(new PropertyValueFactory<>("timestampString"));
The reason for this is that the getTimestamp() method returns a long, whereas we prefer to visualize the timestamp in a more readable format. By adding a getTimestampString() method and pointing the CellValueFactory to this method, the content of the cells in this column will be readable time indications.
The examples we have shown so far in this chapter demonstrate that the Java Platform, Standard Edition, already contains a number of APIs that are very useful when accessing web services. We also showed how to use the JavaFX Concurrent Framework, the ObservableList pattern, JavaFX Properties, and the PropertyValueFactory class to enhance the flow between calling the web service and rendering the data in the JavaFX Controls.
Although there is no rocket science involved in the examples, additional requirements will make things more complex, and more boilerplate code will be required. Fortunately, a number of initiatives have already popped up in the JavaFX community, with the goal of making our lives easier.
Using External Libraries
All our examples so far did not require any additional external library. The Java 2 Platform, Standard Edition, and the JavaFX Platform offer a great environment that can be used for accessing web services. In this section, we use two external libraries and show how they make accessing web services easier.
DataFX
DataFX는 http://datafx.io에 설명되어 있다. 데이터 획득, 파싱, 메시징, 채움, 보기과 보여주기를 위한 end-to-end 툴킷을 제공한다.
These data might be obtained using web services that communicate with well-known protocols such as REST, SSE, or WebSockets, but can also be obtained from a local file system, a database, or a number of other data sources. DataFX 2 was released in late 2013, and DataFX 8 is expected to be released in September 2014.
DataFX 8 consists of a number of modules:
-
Cell Factories, providing a number of useful CellFactories and hence reducing the boilerplate code that is often required in projects
-
DataSources, providing a level of abstraction about the origin of the data, both regarding the physical location (file, network resources) and the format (JSON, XML, JDBC, etc.)
-
DataFlow API, providing developers a convenient way to manage data across workflows, and to use injection
In the next example, we integrate DataFX with our StackExchange example. Once again, the only change is in the getObservableList method, but for clarity, we show the whole main class in Listing 11-18.
*Listing 11-18. * Obtaining Questions Using DataFX
Safari Books Online
Naver Corporation (NHN)
Favorites & Folders
All Shared Lists
Bookmarks
Notes & Tags
Reviews
Help
Help
Support Home
Alerts
Top Knowledge Items
Frequently Asked Questions
Content
Content Reader
Mobile
Hwajeong Song
Hwajeong Song
Account
Tokens and Downloads
Sign Out
Recent Views
Data Science for Business
Pro JavaFX 8
Big Data Glossary
JavaFX Essentials
IntelliJ IDEA Essentials
This Book
Pro JavaFX 8
Pro JavaFX 8Add to Favorites (Key: a)Review this Book
Notes
Bookmarks
Search
Contents
Table of Contents
Cover
Title
Copyright
Contents at a Glance
Contents
About the Authors
About the Technical Reviewer
Acknowledgments
Foreword
Introduction
Chapter 1: Getting a Jump Start in JavaFX
Chapter 2: Creating a User Interface in JavaFX
Chapter 3: Using SceneBuilder to Create a User Interface
Chapter 4: Properties and Bindings
Chapter 5: Building Dynamic UI Layouts in JavaFX
Chapter 6: Using the JavaFX UI Controls
Chapter 7: Collections and Concurrency
Chapter 8: Creating Charts in JavaFX
Chapter 9: Using the Media Classes
Chapter 10: JavaFX 3D
Chapter 11: Accessing Web Services
Front-End and Back-End Platforms
Merging JavaFX and Java Enterprise Modules in the Same Environment
Using JavaFX to Call Remote (Web) Services
SOAP
REST
Summary
Chapter 12: JavaFX on Embedded and Mobile
Chapter 13: JavaFX Languages and Markup
Index
< Return to Search Results
Safari Books Online
Create Bookmark (Key: b)
Create Note or Tag (Key: t)
Email This Page (Key: e)
Zoom Out (Key: -)
Zoom In (Key: +)
Toggle to Full Screen (Key: f)
Previous (Key: p)
Next (Key: n)
URL Show search termsHelp
REST
Create Bookmark
REST
The remainder of this chapter is about calling REST-based web services. Plenty of resources and documentation about REST and REST-based web services can be found on the Internet. REST-based web services expose a number of URIs that can be accessed using the HTTP protocol. Typically, different HTTP request methods (get, post, put, delete) are used to indicate different operations on resources.
REST-based web services can be accessed using standard HTTP technologies, and the Java Platform comes with a number of APIs (mainly in java.io and java.net) that facilitate access to REST-based web services.
One of the major advantages of JavaFX being written on top of the Java Platform, Standard Edition 8, is the ability to use all of these APIs in JavaFX applications. This is what we do in the first examples in this chapter. We show how we can use Java APIs for consuming REST-based web services and how we can integrate the result in a JavaFX application.
Next, we show how to leverage the JavaFX APIs to avoid common pitfalls (e.g., unresponsive applications, no dynamic update, etc.). Finally, we give a brief overview of third-party libraries that make it easy for JavaFX developers to access REST-based web services.
Setting Up the Application
First of all, we create the framework for our samples. We will use the APIs provided by Stack Exchange. The Stack Exchange network is a cluster of forums, each in a specific domain, where questions and answers are combined in such a way that the “best” answers from the most trusted users bubble to the top. Java developers are probably familiar with StackOverflow, which was the first site in Stack Exchange and provides an incredible number of questions and related answers for IT-related issues.
Image Note In the previous edition of this book, Pro JavaFX 2, we used the Twitter API in the examples for this chapter. The Twitter API is still available, and it is very good example of how to use REST services. However, all requests to the Twitter API now need to be authenticated. Although this is fully understandable, it makes it a bit harder to get started with a simple example. As you will see in this chapter, we start by making a simple HTTPConnection to a REST endpoint, and we don’t worry about authentication. The frameworks we introduce near the end of the chapter, are capable of using OAuth-based authentication, and the connection to the Twitter API is left as an exercise for the interested developer.
The REST APIs provided by StackExchange are very well described at https://api.stackexchange.com. It is not our goal to explore all the possibilities offered by StackExchange and the corresponding APIs, so the interested reader is referred to the documentation available on the web site.
In the samples in this chapter, we want to visualize the author of a question, the title of the question, and the day the question was asked.
Initially, we represent a question by a Java Object with getters and setters. This is shown in Listing 11-1.
Listing 11-1. Question Class package projavafx;
public class Question {
private String owner;
private String question;
private long timestamp;
public Question () {
}
public Question (String o, String q, long t) {
    this.owner = o;
    this.question = q;
    this.timestamp = t;
}
public String getOwner() {
    return owner;
}
public void setOwner(String owner) {
    this.owner = owner;
}
public String getQuestion() {
    return question;
}
public void setQuestion(String question) {
    this.question = question;
}
public long getTimestamp() {
    return timestamp;
}
public void setTimestamp(long timestamp) {
    this.timestamp = timestamp;
}
}
Our Question class has two constructors. The zero-arg constructor is needed in one of the following examples and we come back to this later. The constructor that takes three arguments is used for convenience in other examples.
In Listing 11-2, we show how to display questions. In this first example, the questions are not obtained via the StackExchange API, but they are hard-coded in the example.
Listing 11-2. Framework for Rendering Questions in a ListView package projavafx;
import javafx.application.Application; import javafx.collections.FXCollections; import javafx.collections.ObservableList; import javafx.scene.Scene; import javafx.scene.control.ListView; import javafx.scene.layout.StackPane; import javafx.stage.Stage;
public class StackOverflowApp1 extends Application {
public static void main(String[] args) {
    launch(args);
}
@Override
public void start(Stage primaryStage) {
    ListView<Question> listView = new ListView<>();
    listView.setItems(getObservableList());
    StackPane root = new StackPane();
    root.getChildren().add(listView);
    Scene scene = new Scene(root, 500, 300);
    primaryStage.setTitle("StackOverflow List");
    primaryStage.setScene(scene);
    primaryStage.show();
}
ObservableList<Question> getObservableList() {
    ObservableList<Question> answer = FXCollections.observableArrayList();
    long now = System.currentTimeMillis();
    long yesterday = now - 1000 * 60 * 60 * 24;
    Question q1 = new Question("James", "How can I call a REST service?", now);
    Question q2 = new Question("Stephen", "Does JavaFX work on Android?", yesterday);
    answer.addAll(q1, q2);
    return answer;
}
}
If you have read the previous chapters, this code does not contain anything new. We create a ListView, add it to a StackPane, create a Scene, and render the Stage.
The ListView is populated with an ObservableList containing Questions. This ObservableList is obtained by calling the getObservableList() method. In the following samples, we modify this method and show how to retrieve Questions from the StackExchange API.
Image Note The getObservableList returns an ObservableList. The ListView automatically observes this ObservableList. As a consequence, changes in the ObservableList are immediately rendered in the ListView control. In a later sample, we leverage this functionality.
Running this example results in the window shown in Figure 11-3.
9781430265740_Fig11-03.jpg
Figure 11-3. The result of the first example
The resulting window contains a ListView with two entries. Those entries correspond to the two questions that are created in the getObservableList() method at the bottom of Listing 11-2.
The information about the questions that is shown in the window is not very useful. Indeed, we told the ListView that it should display some instances of Question, but we did not tell how those should be displayed. The latter can be achieved by specifying a CellFactory. In this chapter, our goal is not to create a fancy UI; rather, we want to show how to retrieve data and render these data in the UI. Hence, we briefly show how the developer can alter the visualization of data by using the CellFactory concept. For an overview of the UI Controls that we use in our examples (ListView and TableView), refer to Chapter 6.
In Listing 11-3, we create a QuestionCell class that extends ListCell and defines how to lay out a cell.
Listing 11-3. Define QuestionCell package projavafx;
import java.text.SimpleDateFormat; import java.util.Date; import javafx.scene.control.ListCell;
public class QuestionCell extends ListCell<Question> {
    static final SimpleDateFormat sdf = new SimpleDateFormat ("dd-MM-YY");
    @Override
    protected void updateItem(Question question, boolean empty){
        super.updateItem(question, empty);
        if (empty) {
            setText("");
        } else {
            StringBuilder sb= new StringBuilder();
            sb.append("[").append(sdf.format(new Date(question.getTimestamp()))).append("]")
                    .append(" ").append(question.getOwner()+": "+question.getQuestion());
            setText(sb.toString());
        }
    }
}
When a cell item has to be updated, we tell it to show some text containing the timestamp between square brackets, followed by the author and the title of the question. Next, the ListView needs to be told that it should render QuestionCells. We do this by calling the ListView.setCellFactory() method and provide a lambda expression that creates a new QuestionCell when called. In Listing 11-4, we show the modified version of the start method of our StackOverflowApplication.
Listing 11-4. Use CellFactory on the ListView public void start(Stage primaryStage) { ListView<Question> listView = new ListView<>(); listView.setItems(getObservableList()); listView.setCellFactory(l → new QuestionCell()); StackPane root = new StackPane(); root.getChildren().add(listView);
Scene scene = new Scene(root, 500, 300);
    primaryStage.setTitle("StackOverflow List");
    primaryStage.setScene(scene);
    primaryStage.show();
}
If we now run the application, the output appears as in Figure 11-4.
9781430265740_Fig11-04.jpg
Figure 11-4. The result of adding a QuestionCell
For every question that is in the items of the ListView, the output is now what we expected it to be. We can do a lot more with CellFactories (e.g., we can use graphics instead of just text), but that is beyond the scope of this chapter.
We now replace the hard-coded questions with real information obtained via the StackExchange API.
Using the StackExchange API
The Stack Exchange Network (http://stackexchange.com) allows third-party developers to browse and access questions and answers using a REST-based interface. StackExchange maintains a number of REST-based APIs, but for our examples we limit ourselves to the Search API. Detailed information on the Search API is obtained from http://api.stackexchange.com/docs.
The resource URL—the endpoint for the REST service—is very simple: http://api.stackexchange.com/2.2/search
A number of query parameters can be supplied here. We will only use two parameters, and the interested reader is referred to the StackExchange documentation for information about the other parameters.; •Site: Specify the domain you want to search, in our case this is “stackoverflow.” •tagged: A semicolon delimited list of tags. We want to search all questions tagged with “javafx.”
Combining both parameters leads to the following REST call: http://api.stackexchange.com/2.2/search?tagged=javafx&site=stackoverflow
When executing this REST call in a browser, or using a command tool (e.g., curl), the result is something like the JSON-text in Listing 11-5.
Listing 11-5. JSON Response Obtained from the StackExchange Search API { "items": [ { "tags": [ "java", "sorting", "javafx", "tableview" ], "owner": { "reputation": 132, "user_id":578518, "user_type": "registered", "accept_rate": 84, "profile_image":"https://www.gravatar.com/avatar/bdbee99c377a7063b24e09e7121fb1ab?s=128&d=identicon&r=PG", "display_name": "Rps", "link":"http://stackoverflow.com/users/578518/rps" }, "is_answered": false, "view_count": 7, "answer_count": 1, "score": 0, "last_activity_date": 1397845222, "creation_date": 1397844823, "last_edit_date": 1397845143, "question_id":23159737, "link":"http://stackoverflow.com/questions/23159737/javafx-tableview-ordered-by-date", "title": "javafx Tableview ordered by date" },
… ,"has_more":true ,"quota_max":300, "quota_remaining":290 }
The StackExchange API only provides JSON-based responses. A number of web services deliver information in XML, and others provide both JSON and XML. Because we want to show how to process XML responses as well, we create our own XML-based output for the StackExchange REST Service. Rather than calling an external REST endpoint, this XML response will be obtained by reading a local file.
Our self-defined XML response is shown in Listing 11-6.
Listing 11-6. Artificial XML Response Obtained from the StackExchange Search API <?xml version="1.0" encoding="UTF-8"?>
<items>
<item>
<tags>
<tag>java</tag>
<tag>sorting</tag>
<tag>javafx</tag>
<tag>tableview</tag>
</tags>
<owner>Rps</owner>
<creation_date>1397844823</creation_date>
<title>javafx Tableview ordered by date</title>
<item>
</items>
Although the data in the JSON response contain the same information as the data in the XML response, the format is, of course, very different. JSON and XML are both widely used on the Internet, and a large number of web services offer responses in both formats.
Depending on the use case and the developer, one format might be preferred over the other. In general, JavaFX applications should be able to work with both formats, because they have to connect with third-party data, and the JavaFX developer cannot always influence the data format used by the back end.
Image Note Many applications allow a number of formats, and by specifying the HTTP “Accept” Header, the client can choose between the different formats.
In the next example, we show how to retrieve and parse the JSON response used in the StackExchange Search API.
JSON Response Format
JSON is a very popular format on the Internet, especially in web applications where incoming data are parsed with JavaScript. JSON data are rather compact and more or less human readable.
A number of tools exist in Java for reading and writing JSON data. As of June 2013, when Java Enterprise Edition 7 was released, there is a standard specification in Java that describes how to read and write JSON data. This Java specification is defined as JSR 353, and more information can be obtained at http://www.jcp.org/en/jsr/detail?id=353.
JSR 353 only defines a specification, and an implementation is still needed to do the actual work. In our examples, we will use jsonp, which is the Reference Implementation of JSR 353. This Reference Implementation can be found at https://jsonp.java.net/. Readers are encouraged to try out their favorite implementation of JSR 353, though.
Although JSR 353 is a specification that is part of the Java Enterprise Edition umbrella, the reference implementation also works in a Java Standard Edition environment. There are no external dependencies.
We now replace the hard-coded list containing two fake questions with real questions obtained via the StackExchange REST API. We keep the existing code, but we modify the getObservableList() method as shown in Listing 11-7.
Listing 11-7. Obtain Questions Via the StackExchange REST API, JSON Format and Parse the JSON ObservableList<Question> getObservableList() throws IOException { String url = "http://api.stackexchange.com/2.2/search?tagged=javafx&site=stackoverflow"; URL host = new URL(url); JsonReader jr = Json.createReader(new GZIPInputStream(host.openConnection().getInputStream()));
JsonObject jsonObject = jr.readObject();
JsonArray jsonArray = jsonObject.getJsonArray("items");
ObservableList<Question> answer = FXCollections.observableArrayList();
    jsonArray.iterator().forEachRemaining((JsonValue e) -> {
        JsonObject obj = (JsonObject) e;
        JsonString name = obj.getJsonObject("owner").getJsonString("display_name");
        JsonString quest = obj.getJsonString("title");
        JsonNumber jsonNumber = obj.getJsonNumber("creation_date");
        Question q = new Question(name.getString(), quest.getString(), jsonNumber.longValue() * 1000);
        answer.add(q);
    });
    return answer;
}
Before we dive into the code, we show the result of the modified application in Figure 11-5.
9781430265740_Fig11-05.jpg
Figure 11-5. The result of the StackOverflowApplication retrieving JSON data
The code in Listing 11-7 can be divided into four parts: 1.Call the REST endpoint. 2.Obtain the raw JSON data. 3.Convert each item into a question. 4.Add the Questions to the result.
Calling the REST endpoint is very straightforward: String url = "http://api.stackexchange.com/2.2/search?tagged=javafx&site=stackoverflow"; URL host = new URL(url); JsonReader jr = Json.createReader(new GZIPInputStream(host.openConnection().getInputStream()));
First, we create a URL Object that refers to the desired location. Next, we open the connection to the location. Because StackExchange is sending its data as zipped data, we open a GZIPInputStream using the InputStream obtained from the connection. We pass this GZIPInputStream as the InputStream argument in the Json.createReader() method.
We now have a JSON reader that consumes the data we want to have. Extracting Java Objects from this JSON reader manually requires specific code for a specific case.
Image Note We could also have used a JSON parser instead of a JSON reader. It is not our intention to deliver an exhaustive JSON parsing guide. We only try to show how JSON data can be converted into Java Objects for our specific use case. You can easily find a number of tutorials on JSON on the Internet.
In Listing 11-5, we observe that the questions are in an array named items, starting with the left square bracket ([). We can obtain this JSON array using the following statement: JsonArray jsonArray = jsonObject.getJsonArray("items");
Next, we need to iterate over all these elements. For every item we encounter, we want to create a Question instance.
Iterating over the array elements can be done using jsonArray.iterator().forEachRemaining((JsonValue e) → { … }
To create a Question instance, we need to obtain the name of the author, the title, and the creation date of the question. The Java JSON API provides a standard way for doing this: JsonObject obj = (JsonObject) e; JsonString name = obj.getJsonObject("owner").getJsonString("display_name"); JsonString quest = obj.getJsonString("title"); JsonNumber jsonNumber = obj.getJsonNumber("creation_date");
Finally, we need to create a Question instance based on this information, and add it to the ObservableList instance we will return: Question q = new Question(name.getString(), quest.getString(), jsonNumber.longValue() * 1000); answer.add(q);
This example shows that it is very easy to retrieve and read JSON data obtained from a REST endpoint, and convert the result into a ListView. In the next section, we demonstrate a similar process for XML responses.
XML Response Format
The XML format is widely used in the Java platform. As a consequence, standardization of XML-based operations in Java happened years ago. There are a number of XML tools built into the Java Platform, Standard Edition, and we can use these APIs and tools in JavaFX without any external dependency. In this section, we first use a DOM processor for parsing the XML response that we artificially built. Next, we use the JAXB standard to automatically obtain Java Objects.
Changing our application from JSON input to XML input requires only the getObservableList method to be changed. The new implementation is shown in Listing 11-8.
Listing 11-8. Obtaining Questions from the XML-Based Response ObservableList<Question> getObservableList() throws IOException, ParserConfigurationException, SAXException { ObservableList<Question> answer = FXCollections.observableArrayList(); InputStream inputStream = this.getClass().getResourceAsStream("/stackoverflow.xml"); DocumentBuilderFactory dbf = DocumentBuilderFactory.newInstance(); DocumentBuilder db = dbf.newDocumentBuilder(); Document doc = db.parse(inputStream); NodeList questionNodes = doc.getElementsByTagName("item"); int count = questionNodes.getLength(); for (int i = 0; i < count; i++) { Question question = new Question(); Element questionNode = (Element) questionNodes.item(i);
        NodeList childNodes = questionNode.getChildNodes();
        int cnt2 = childNodes.getLength();
        for (int j = 0; j < cnt2; j++) {
             Node me = childNodes.item(j);
             String nodeName = me.getNodeName();
             if ("creation_date".equals(nodeName)) {
                 question.setTimestamp(Long.parseLong(me.getTextContent()));
             }
             if ("owner".equals(nodeName)) {
                 question.setOwner(me.getTextContent());
             }
             if ("title".equals(nodeName)) {
                 question.setQuestion(me.getTextContent());
             }
    }
    answer.add(question);
}
return answer;
}
Again, the goal of this section is not to give a comprehensive overview of the DOM APIs. There are a large number of resources available on the Internet that provide information about XML in general, or DOM in particular.
To be able to compile the code in Listing 11-8, the following import statements had to be added. import javax.xml.parsers.DocumentBuilder; import javax.xml.parsers.DocumentBuilderFactory; import javax.xml.parsers.ParserConfigurationException; import org.w3c.dom.Document; import org.w3c.dom.Node; import org.w3c.dom.NodeList; import org.xml.sax.SAXException;
Before we go into detail about the code, we show the output of this example in Figure 11-6.
9781430265740_Fig11-06.jpg
Figure 11-6. The result of the question application using XML response
The code in Listing 11-8 shows some similarities to the code in Listing 11-7. In both cases, we process data available in a text format (JSON or XML) and convert the data into Question instances. In Listing 11-8, the DOM approach is used to inspect the received response.
An org.w3c.dom.Document instance is obtained using the following code. InputStream inputStream = this.getClass().getResourceAsStream("/stackoverflow.xml"); DocumentBuilderFactory dbf = DocumentBuilderFactory.newInstance(); DocumentBuilder db = dbf.newDocumentBuilder(); Document doc = db.parse(inputStream);
In this case, we create a Document based on an InputStream. The InputStream is obtained from the artificially created file. We can also create an InputStream from a URLConnection, and pass this InputStream to the db.parse() method. Even easier, the DocumentBuilder.parse method also accepts a String parameter that contains the URL of a (REST) endpoint.
This shows that although we are using a static file containing questions in this case, we can easily use the same code when using a real REST endpoint.
The resulting Document can now be queried. From the XML response shown in Listing 11-6, we learn that the individual questions are enclosed in XML Elements named “item”. We use the following to obtain a list of those XML Elements. NodeList questionNodes = doc.getElementsByTagName("item");
We then iterate over this list, and obtain the question-specific fields by inspecting the childNodes in the respective XML Elements. Finally, we add the resulting question to the ObservableList of Question objects named answer.
This approach is rather simple, but we still have to do some manual XML parsing. Although this allows for flexibility, parsing becomes harder and more error prone with increasing complexity of the data structure.
Fortunately, the Java Standard Edition APIs contain tools for converting XML directly into Java Objects. The specification for these APIs is defined by the JAXB standard, and is available in the javax.xml.bind package. The process of converting XML data into Java Objects is called unmarshalling.
We now modify our example and make it use a mix of DOM parsing and JAXB unmarshalling. Again, we only change the getObservableList() method. The modified implementation is shown in Listing 11-9.
Listing 11-9. Combining XML Parsing and JAXB ObservableList<Question> getObservableList() throws IOException, ParserConfigurationException, SAXException { ObservableList<Question> answer = FXCollections.observableArrayList(); InputStream inputStream = this.getClass().getResourceAsStream("/stackoverflow.xml"); DocumentBuilderFactory dbf = DocumentBuilderFactory.newInstance(); DocumentBuilder db = dbf.newDocumentBuilder(); Document doc = db.parse(inputStream); NodeList questionNodes = doc.getElementsByTagName("item"); int count = questionNodes.getLength(); for (int i = 0; i < count; i++) { Element questionNode = (Element) questionNodes.item(i); DOMSource source = new DOMSource(questionNode); final Question question = (Question) JAXB.unmarshal(source, Question.class);
    answer.add(question);
}
return answer;
}
The only difference between this approach and the approach used in Listing 11-8 is the parsing of the individual questions. Instead of using DOM parsing for obtaining the specific fields of the individual questions, we use the unmarshal method in JAXB. The JAXB specifications allow for lots of flexibility and configuration, and the JAXB.unmarshal method is only a convenience method. However, in many cases, this method is sufficient. The JAXB.unmarshal method takes two parameters: the input source and the class that is the result of the conversion.
We want to convert the XML source into instances of our Question class, but how does the JAXB framework know how to map the fields? In many cases, the mapping is straightforward and does not require changes to existing code, but in other cases, the mapping is a bit more complex. Good enough, a whole package with annotations exists that we can use to help JAXB determine the conversion between XML and the Java Object.
To make the code in Listing 11-9 work, we made some minor modifications to the Question class. The new code for the Question class is shown in Listing 11-10.
Listing 11-10. Question Class with JAXB Annotations package projavafx;
import javax.xml.bind.annotation.XmlAccessType; import javax.xml.bind.annotation.XmlAccessorType; import javax.xml.bind.annotation.XmlElement;
@XmlAccessorType(XmlAccessType.FIELD) public class Question {
private String owner;
@XmlElement(name = "title")
private String question;
@XmlElement(name = "creation_date")
private long timestamp;
public Question(String o, String q, long t) {
    this.owner = o;
    this.question = q;
    this.timestamp = t;
}
public Question() {
}
/**
 * @return the owner
 */
public String getOwner() {
    return owner;
}
/**
 * @param owner the owner to set
 */
public void setOwner(String owner) {
    this.owner = owner;
}
/**
 * @return the question
 */
public String getQuestion() {
    return question;
}
/**
 * @param question the question to set
 */
public void setQuestion(String question) {
    this.question = question;
}
/**
 * @return the timestamp
 */
public long getTimestamp() {
    return timestamp;
}
/**
 * @param timestamp the timestamp to set
 */
public void setTimestamp(long timestamp) {
    this.timestamp = timestamp;
}
}
We added three annotations to the original Question class. First, we annotated the class itself with @XmlAccessorType(XmlAccessType.FIELD)
This annotation tells the JAXB framework to map XML data on the fields of this class, as opposed to on the JavaBean properties (getter/setter methods) of this class. The second and third annotations are added to the question field and the timeStamp field: @XmlElement(name = "title") private String question; @XmlElement(name = "creation_date") private long timestamp;
This indicates that the question field corresponds to an XML element named “title” and that the timestamp field corresponds to an XML element named “creation_date.” Indeed, if we look at Listing 11-6, it shows that the question is in an element with the name “title” and that the timestamp is in an element with the name “creation_date.” We have to instruct the JAXB runtime to map this element with our timestamp field, and this is what we do with the @XmlElement annotation.
Using the JAXB annotations made it easy to convert the XML question elements into individual Question instances, but we still had some manual XML processing in our main class. However, we can completely remove the manual XMLParsing and convert the whole XML response into a Java Object. Doing so, the getObservableList() method becomes very simple, as shown in Listing 11-11.
Listing 11-11. Parsing Incoming XML Data Using JAXB ObservableList<Question> getObservableList() { InputStream inputStream = this.getClass().getResourceAsStream("/stackoverflow.xml"); QuestionResponse response = JAXB.unmarshal(inputStream, QuestionResponse.class); return FXCollections.observableArrayList(response.getItem()); }
In this example, we use JAXB to convert the XML response into an instance of QuestionResponse, and the questions are then obtained via this QuestionResponse instance. Note that we convert the questions from a regular List object into an ObservableList object, as required by the method signature. We later show an example where we don’t have to do that additional conversion.
The QuestionResponse class has two goals: map the XML response onto a Java Object and make the question items available as a List of Question instances. This is achieved by the code in Listing 11-12.
Listing 11-12. QuestionResponse Class, Enabling Conversion Between XML Response and Java Objects package projavafx;
import java.util.List; import javax.xml.bind.annotation.XmlAccessType; import javax.xml.bind.annotation.XmlAccessorType; import javax.xml.bind.annotation.XmlRootElement;
@XmlRootElement(name="items") @XmlAccessorType(XmlAccessType.FIELD) public class QuestionResponse {
private List<Question> item;
public List<Question> getItem() {
    return item;
}
    public void setItem(List<Question> item) {
        this.item = item;
    }
}
The QuestionResponse class itself has two annotations: @XmlAccessorType(XmlAccessType.FIELD)
was already discussed before and @XmlRootElement(name="items")
indicates that this class corresponds to a root object in the XML structure, with the name “items.” This indeed corresponds to the syntax of the XML response we created in Listing 11-6.
The previous examples show how existing technologies available in the Java 2 Platform, Standard Edition, can be used to obtain data from web services and inject these data in JavaFX controls. We now modify the example code to take advantage of some specific features of the JavaFX Platform.
Asynchronous Processing
A major problem with the examples so far is that they block the UI during the process of data retrieval and parsing. In many real-world situations, this is unacceptable. Calls to external web services might take longer than expected due to network or server issues. Even when the external calls are fast, a temporarily unresponsive UI decreases the overall quality of the application.
Fortunately, the JavaFX Platform allows for concurrency and asynchronous tasks. The concepts of Task, Worker, and Service have already been discussed in Chapter 7. In this section, we show how to leverage the javafx.concurrent package when accessing web services. We also leverage the fact that the ListView watches the ObservableList that contains its items.
The basic idea is that, when creating the ListView, we immediately return an empty ObservableList, while retrieving the data in a background Thread. Once we retrieve and parse the data, we add it to the ObservableList and the result will immediately be visible in the ListView.
The main class for this example is shown in Listing 11-13. We started with the code in Listing 11-7, where we obtained the questions in JSON format using a REST request to the StackExchange API. With some minor modifications, we could use the XML response as well, though.
Listing 11-13. Use a Background Thread for Retrieving Question ListView. package projavafx;
import java.io.IOException; import javafx.application.Application; import static javafx.application.Application.launch; import javafx.beans.InvalidationListener; import javafx.beans.Observable; import javafx.collections.FXCollections; import javafx.collections.ObservableList; import javafx.concurrent.Service; import javafx.concurrent.Worker; import javafx.scene.Scene; import javafx.scene.control.ListView; import javafx.scene.layout.StackPane; import javafx.stage.Stage;
public class StackOverflow4 extends Application {
@Override
public void start(Stage primaryStage) throws IOException {
    ListView<Question> listView = new ListView<>();
    listView.setItems(getObservableList());
    listView.setCellFactory(l -> new QuestionCell());
    StackPane root = new StackPane();
    root.getChildren().add(listView);
Scene scene = new Scene(root, 500, 300);
    primaryStage.setTitle("StackOverflow List");
    primaryStage.setScene(scene);
    primaryStage.show();
    System.out.println (« Done with the setup ») ;
}
ObservableList<Question> getObservableList() throws IOException {
    String url = "http://api.stackexchange.com/2.2/search?order=desc&sort=activity&tagged=javafx&site=stackoverflow";
    Service<ObservableList<Question>>service = new QuestionRetrievalService(url);
ObservableList<Question> answer = FXCollections.observableArrayList();
service.stateProperty().addListener(new InvalidationListener() {
        @Override
        public void invalidated(Observable observable) {
            System.out.println("value is now "+service.getState());
            if (service.getState().equals(Worker.State.SUCCEEDED)) {
                answer.addAll(service.getValue());
            }
        }
    });
    System.out.println("START SERVICE = "+service.getTitle());
    service.start();
    return answer;
}
    /**
     * @param args the command line arguments
     */
    public static void main(String[] args) {
        launch(args);
    }
}
The main method is not different from the previous example, apart from the addition of a System.out log message that will print a message when we are done with the setup.
The getObservableList method will first create an instance of ObservableList, and this instance is returned on method completion. Initially, this instance will be an empty list. In this method, an instance of QuestionRetrievalService is created and the location of the REST endpoint is passed in the constructor. The QuestionRetrievalService, which extends javafx.concurrent.Service, is started, and we listen for changes in the State of the Service. When the state of the Service changes to State.SUCCEEDED, we add the retrieved questions to the ObservableList. Note that on every state change in the instance of the QuestionRetrievalService, we log a message to System.out.
We now take a closer look at the QuestionRetrievalService to understand how it starts a new Thread, and how it makes sure that the retrieved questions are added to the ListView control using the JavaFX Thread. The code of the QuestionRetrievalService is shown in Listing 11-14.
Listing 11-14. QuestionRetrievalService package projavafx;
import java.net.URL; import java.util.zip.GZIPInputStream; import javafx.collections.FXCollections; import javafx.collections.ObservableList; import javafx.concurrent.Service; import javafx.concurrent.Task; import javax.json.Json; import javax.json.JsonArray; import javax.json.JsonNumber; import javax.json.JsonObject; import javax.json.JsonReader; import javax.json.JsonString; import javax.json.JsonValue;
public class QuestionRetrievalService extends Service<ObservableList<Question>> {
private String loc;
public QuestionRetrievalService(String loc) {
    this.loc = loc;
}
@Override
protected Task<ObservableList<Question>>createTask() {
    return new Task<ObservableList<Question>>() {
@Override
protected ObservableList<Question> call() throws Exception {
    URL host = new URL(loc);
    JsonReader jr = Json.createReader(new GZIPInputStream(host.openConnection().getInputStream()));
JsonObject jsonObject = jr.readObject();
JsonArray jsonArray = jsonObject.getJsonArray("items");
ObservableList<Question> answer = FXCollections.observableArrayList();
            jsonArray.iterator().forEachRemaining((JsonValue e) -> {
                JsonObject obj = (JsonObject) e;
                JsonString name = obj.getJsonObject("owner").getJsonString("display_name");
                JsonString quest = obj.getJsonString("title");
                JsonNumber jsonNumber = obj.getJsonNumber("creation_date");
                Question q = new Question(name.getString(), quest.getString(), jsonNumber.longValue() * 1000);
                System.out.println("Adding question "+q);
                answer.add(q);
            });
            return answer;
        }
    };
}
}
The QuestionRetrievalService extends Service and thus has to implement a createTask method. When the Service is started, this task is executed in a separate Thread. The createTask method on the QuestionRetrievalService creates a new Task and returns it. The signature of this method, Task<ObservableList<Question>>createTask(),
ensures that the Task creates an ObservableList of questions. The generic type parameter ObservableList<Question> is the same as the type parameter in the declaration of the Service. As a consequence, the getValue() method of the Service will also return an ObservableList of Questions.
Indeed, the following code snippet states that the questionRetrievalService.getValue() should return an ObservableList<Question>. ObservableList<Question> answer = FXCollections.observableArrayList(); … if (now == State.SUCCEEDED) { answer.addAll(service.getValue()); }
The Task instance that we created in the QuestionRetrievalService has to implement the call method. This method is actually doing what the getObservableList method in the previous examples was doing: retrieving the data and parsing them.
Although the real work in a Service (the Task created by createTask) is done in a background Thread, all methods on the Service, including the getValue() call, should be accessed from the JavaFX Thread. The internal implementation makes sure that all changes to the available properties in the Service are executed on the JavaFX application Thread.
Running the example gives the exact same visual output as running the previous example. However, we added some System.out messages for clarity. If we run the example, the following messages can be seen on the console. State of service is READY State of service is SCHEDULED Done with the setup State of service is RUNNING Adding question projavafx.Question@482fb3d5 … Adding question projavafx.Question@2d622bf7 State of service is SUCCEEDED
This shows that the getObservableList method returns before the questions are obtained and added to the list.
Image Note In theory, you could notice a different behavior inasmuch as the background thread might be completed before the other initialization has been done. In practice, however, this behavior is unlikely when network calls are involved.
Converting Web Services Data to TableView
So far, all our examples showed questions in a ListView. The ListView is an easy and powerful JavaFX Control, however, there are other controls that are in some cases more suitable to render information.
We can show the Question data in a TableView as well, and that is what we do in this section. The retrieval and parsing of the data stay the same as in the previous example. However, we now use a TableView to render the data, and we have to define which columns we want to see. For each column, we have to specify the origination of the data. The code in Listing 11-15 shows the start method used in the example.
Listing 11-15. The Start Method in the Application Rendering Questions in a TableView @Override public void start(Stage primaryStage) throws IOException { TableView<Question> tableView = new TableView<>(); tableView.setItems(getObservableList()); TableColumn<Question, String> dateColumn = new TableColumn<>("Date"); TableColumn<Question, String> ownerColumn = new TableColumn<>("Owner"); TableColumn<Question, String> questionColumn = new TableColumn<>("Question"); dateColumn.setCellValueFactoryCellDataFeatures<Question, String> cdf) → { Question q = cdf.getValue(); return new SimpleStringProperty(getTimeStampString(q.getTimestamp(); }); ownerColumn.setCellValueFactoryCellDataFeatures<Question, String> cdf) → { Question q = cdf.getValue(); return new SimpleStringProperty(q.getOwner(; }); questionColumn.setCellValueFactoryCellDataFeatures<Question, String> cdf) → { Question q = cdf.getValue(); return new SimpleStringProperty(q.getQuestion(; }); questionColumn.setPrefWidth(350); tableView.getColumns().addAll(dateColumn, ownerColumn, questionColumn); StackPane root = new StackPane(); root.getChildren().add(tableView);
Scene scene = new Scene(root, 500, 300);
    primaryStage.setTitle("StackOverflow Table");
    primaryStage.setScene(scene);
    primaryStage.show();
}
Clearly, this example requires more code than the example showing a ListView. Setting up a table is slightly more complex, due to the different columns that are involved. There is not much difference between setting the contents of the ListView and setting the contents of the TableView. This is achieved doing tableView.setItems(getObservableList());
where the getObservableList() method is the same implementation as in the previous example. Note that we could also use the convenient constructor TableView<Question> tableView = new TableView<>(getObservableList());
When using a TableView, we have to define a number of TableColumns. This is done in the following code snippet. TableColumn<Question, String> dateColumn = new TableColumn<>("Date"); TableColumn<Question, String> ownerColumn = new TableColumn<>("Owner"); TableColumn<Question, String> questionColumn = new TableColumn<>("Question");
Using the TableColumn constructor, we create one TableColumn with title “Date,” one with title “Owner,” and a third one titled “Question.” The Generics <Question, String> indicate that each entry in a row represents a Question, and the individual cells in the specified column are of type String.
Next, the instances of TableColumn that we created need to know what data they should render. This is done using CellFactories, as shown in the following snippet. dateColumn.setCellValueFactoryCellDataFeatures<Question, String> cdf) → { Question q = cdf.getValue(); return new SimpleStringProperty(getTimeStampString(q.getTimestamp(); });
A detailed description of the setCellValueFactory method is beyond the scope of this chapter. The reader is encouraged to have a look at the JavaDoc of the TableView and TableColumn classes while working with tables. The JavaDoc explains that we have to specify a Callback class with a call method that returns an ObservableValue containing the content of the specific cell. Fortunately, we can use a lambda expression for this.
The question we are displaying in this row can be obtained via the CellDataFeatures instance that is passed as the single parameter in this lambda expression. Because we want to show the timestamp, we return a SimpleStringProperty whose content is set to the timestamp of the specified Question.
The same technique has to be used for the other TableColumns (containing the owner and the question contained within the applicable Question object).
Finally, we have to add the columns to the TableView: tableView.getColumns().addAll(dateColumn, ownerColumn, questionColumn);
Running this example results in the visual output shown in Figure 11-7.
9781430265740_Fig11-07.jpg
Figure 11-7. Using a TableView for rendering questions
This sample requires lots of boilerplate code for a simple table, but fortunately the JavaFX Platform contains a way to reduce the amount of code. Manually setting the CellValueFactory instances for each column is cumbersome, but we can use another method for doing this, by using JavaFX Properties. Listing 11-16 contains a modified version of the start method of the main class, where we leverage the JavaFX Properties concept.
Listing 11-16. Rendering Data in Columns Based on JavaFX Properties @Override public void start(Stage primaryStage) throws IOException { TableView<Question> tableView = new TableView<>(); tableView.setItems(getObservableList()); TableColumn<Question, String> dateColumn = new TableColumn<>("Date"); TableColumn<Question, String> ownerColumn = new TableColumn<>("Owner"); TableColumn<Question, String> questionColumn = new TableColumn<>("Question"); dateColumn.setCellValueFactory(new PropertyValueFactory<>("timestampString")); ownerColumn.setCellValueFactory(new PropertyValueFactory<>("owner")); questionColumn.setCellValueFactory(new PropertyValueFactory<>("question")); questionColumn.setPrefWidth(350); tableView.getColumns().addAll(dateColumn, ownerColumn, questionColumn); StackPane root = new StackPane(); root.getChildren().add(tableView);
Scene scene = new Scene(root, 500, 300);
    primaryStage.setTitle("StackOverflow Table");
    primaryStage.setScene(scene);
    primaryStage.show();
}
This code is clearly shorter than the code in the previous sample. We actually replaced dateColumn.setCellValueFactoryCellDataFeatures<Question, String> cdf) → { Question q = cdf.getValue(); return new SimpleStringProperty(getTimeStampString(q.getTimestamp(); });
by dateColumn.setCellValueFactory(new PropertyValueFactory<>("timestampString"));
The same holds for the ownerColumn and the questionColumn.
We are using instances of javafx.scene.control.cell.PropertyValueFactory<S,T>(String name) for defining what specific data should be rendered in which cell.
The PropertyValueFactory searches for a JavaFX property with the specified name and returns the ObservableValue of this property when called. In case no property with such a name can be found, the JavaDoc says the following.
In this example, the “firstName” string is used as a reference to an assumed firstNameProperty() method in the Person class type (which is the class type of the TableView items list). Additionally, this method must return a Property instance. If a method meeting these requirements is found, then the TableCell is populated with this ObservableValue. In addition, the TableView will automatically add an observer to the returned value, such that any changes fired will be observed by the TableView, resulting in the cell immediately updating.
If no method matching this pattern exists, there is fall-through support for attempting to call get<property>() or is<property>() (that is, getFirstName() or is FirstName() in the example above). If a method matching this pattern exists, the value returned from this method is wrapped in a ReadOnlyObjectWrapper and returned to the TableCell. However, in this situation, this means that the TableCell will not be able to observe the ObservableValue for changes (as is the case in the first approach above).
From this, it is clear that JavaFX Properties are the preferred way for rendering information in a TableView. So far, we used the POJO Question class with JavaBean getter and setter methods as the value object for being displayed in both a ListView and a TableView.
Although the preceding example also works without using JavaFX Properties, as stated by the JavaDoc, we now modify the Question class to use a JavaFX Property for the owner information. The timeStamp and the text fields could have been modified to use JavaFX Properties as well, but the mixed example shows that the fall-through scenario described in the JavaDoc really works. The modified Question class is shown in Listing 11-17.
Listing 11-17. Implementation of Question Class Using JavaFX Properties for the Author Field package projavafx;
import java.text.SimpleDateFormat; import java.util.Date; import javafx.beans.property.SimpleStringProperty; import javafx.beans.property.StringProperty; import javax.xml.bind.annotation.XmlAccessType; import javax.xml.bind.annotation.XmlAccessorType;
@XmlAccessorType(XmlAccessType.PROPERTY) public class Question {
static final SimpleDateFormat sdf = new SimpleDateFormat ("dd-MM-YY");
private StringProperty ownerProperty = new SimpleStringProperty();
private String question;
private long timestamp;
public Question (String o, String q, long t) {
    this.ownerProperty.set(o);
    this.question = q;
    this.timestamp = t;
}
public String getOwner() {
    return ownerProperty.get();
}
public void setOwner(String owner) {
    this.ownerProperty.set(owner);
}
public String getQuestion() {
    return question;
}
public void setQuestion(String question) {
    this.question = question;
}
public long getTimestamp() {
    return timestamp;
}
public void setTimestamp(long timestamp) {
    this.timestamp = timestamp;
}
public String getTimestampString() {
    return sdf.format(new Date(timestamp));
}
}
There are a few things to note about this implementation. The ownerProperty follows the standard JavaFX Convention, as explained in Chapter 3.
Apart from the introduction of JavaFX Properties, there is another major change in the implementation of the Question class. The class is now annotated with @XmlAccessorType(XmlAccessType.PROPERTY)
The reason for this is that when doing so, the setter methods will be called by the JAXB.unmarshal method when it creates an instance of the Question with some specific information. Now that we are using JavaFX Properties instead of primitive types, this is required. The JAXB framework could easily assign the value of the XML Element “owner” to the owner String field, but it cannot assign a value to a JavaFX Property object by default.
By using XmlAccessType.PROPERTY, the setOwner(String v) method will be called by the JAXB framework, supplying the value of the XML Element to the setOwner method. The implementation of this method ownerProperty.set(owner);
will then update the JavaFX Property that is subsequently being used by the TableColumn and the TableView.
The other important change in the Question implementation is that we added a method String getTimestampString()
This method will return the timestamp in a human-readable format. You might have noticed in Listing 11-16 that we set the CellValueFactory for the dateColumn to a PropertyValueFactory that points to “timestampString” rather than “timeStamp”: dateColumn.setCellValueFactory(new PropertyValueFactory<>("timestampString"));
The reason for this is that the getTimestamp() method returns a long, whereas we prefer to visualize the timestamp in a more readable format. By adding a getTimestampString() method and pointing the CellValueFactory to this method, the content of the cells in this column will be readable time indications.
The examples we have shown so far in this chapter demonstrate that the Java Platform, Standard Edition, already contains a number of APIs that are very useful when accessing web services. We also showed how to use the JavaFX Concurrent Framework, the ObservableList pattern, JavaFX Properties, and the PropertyValueFactory class to enhance the flow between calling the web service and rendering the data in the JavaFX Controls.
Although there is no rocket science involved in the examples, additional requirements will make things more complex, and more boilerplate code will be required. Fortunately, a number of initiatives have already popped up in the JavaFX community, with the goal of making our lives easier.
Using External Libraries
All our examples so far did not require any additional external library. The Java 2 Platform, Standard Edition, and the JavaFX Platform offer a great environment that can be used for accessing web services. In this section, we use two external libraries and show how they make accessing web services easier.
DataFX
The DataFX library is described at http://datafx.io and it provides an end-to-end toolkit for retrieving, parsing, massaging, populating, viewing, and rendering data. These data might be obtained using web services that communicate with well-known protocols such as REST, SSE, or WebSockets, but can also be obtained from a local file system, a database, or a number of other data sources. DataFX 2 was released in late 2013, and DataFX 8 is expected to be released in September 2014.
DataFX 8 consists of a number of modules: •Cell Factories, providing a number of useful CellFactories and hence reducing the boilerplate code that is often required in projects •DataSources, providing a level of abstraction about the origin of the data, both regarding the physical location (file, network resources) and the format (JSON, XML, JDBC, etc.) •DataFlow API, providing developers a convenient way to manage data across workflows, and to use injection
In the next example, we integrate DataFX with our StackExchange example. Once again, the only change is in the getObservableList method, but for clarity, we show the whole main class in Listing 11-18.
Listing 11-18. Obtaining Questions Using DataFX
public class StackOverflowDataFX extends Application {

    @Override
    public void start(Stage primaryStage) throws IOException {
        ListView<Question> listView = new ListView<>();
        listView.setItems(getObservableList());
        listView.setCellFactory(l -> new QuestionCell());
        StackPane root = new StackPane();
        root.getChildren().add(listView);

        Scene scene = new Scene(root, 500, 300);

        primaryStage.setTitle("StackOverflow List");
        primaryStage.setScene(scene);
        primaryStage.show();
        System.out.println ("Done with the setup");
    }

    ObservableList<Question> getObservableList() throws IOException {
        InputStreamConverter converter = new JsonConverter("item", Question.class);

        RestSource restSource = RestSourceBuilder.create()
                .converter(converter)
                .host("http://api.stackexchange.com")
                .path("2.2").path("search")
                .queryParam("order", "desc")
                .queryParam("sort", "activity")
                .queryParam("tagged", "javafx")
                .queryParam("site", "stackoverflow").build();
        ListDataProvider<Question> ldp = ListDataProviderBuilder.create()
                .dataReader(restSource)
                .build();
        Worker<ObservableList<Question>>retrieve = ldp.retrieve();
        return retrieve.getValue();
    }

public static void main(String[] args) {
        launch(args);
    }
}
The relevant part, the implementation of the getObservableList method, is very simple. We first construct a JsonConverter that will convert JSON objects named “item” to Question instances.
Next, we create a RestSource, and assign the converter to it. We also supply information on the REST endpoint. We then create a ListDataSource that will use the RestSource and retrieve the data.
ListDataSource.retrieve는 비동기 서비스로 시작한다. 결과를 기다리지 않고 결과 객체를 비주얼 콘트롤에 즉시 반환한다. DataFX 프레임워크는 들어오는 데이터를 읽고 파싱하면서 결과 객체를 갱신할 것이다. 데이터가 클 경우 매우 유용하다.
JAX-RS
The release of Java Enterprise Edition 7 includes the release of JAX-RS 2.0. This specification not only defines how Java developers can provide REST endpoints, but also how Java code can consume REST endpoints. Java Enterprise Edition 7에 JAX-RS 2.0 릴리즈가 포함되었다. 이 명세는 REST 종단점을 제공하도록 정의하고 있으며 REST 종단점을 소비하는 코딩도 할 수 있도록 한다.
In the next example, we modify the QuestionRetrievalService of Listing 11-14 to use the JAX-RS API. This is shown in Listing 11-19.
Listing 11-19. Using JAX-RS for Retrieving Questions
public class QuestionRetrievalService extends Service<ObservableList<Question>> {

    private String loc;
    private String path;
    private String search;

    public QuestionRetrievalService(String loc, String path, String search) {
        this.loc = loc;
        this.path = path;
        this.search = search;
    }

    @Override
    protected Task<ObservableList<Question>>createTask() {
        return new Task<ObservableList<Question>>() {
            @Override
            protected ObservableList<Question> call() throws Exception {
                Client client = ClientBuilder.newClient();
                WebTarget target = client.target(loc).path(path).queryParam("tagged", search).queryParam("site", "stackoverflow");
                QuestionResponse response = target.request(MediaType.APPLICATION_JSON).get(QuestionResponse.class);
                return FXCollections.observableArrayList(response.getItem());

            }
        };
    }

}
To show one of the nice tools of JAX-RS, we slightly modified the constructor of the QuestionRetrievalService to take three parameters:
public QuestionRetrievalService(String host, String path, String search);This is because JAX-RS allows us to use the Builder pattern to construct REST resources, allowing a distinction among hostname, path, query parameters, and others.
As a consequence, we have to make a slight modification in Listing 11-13:
String url = "http://api.stackexchange.com/2.2/search?order=desc&sort=activity&tagged=javafx&site=stackoverflow";
Service<ObservableList<Question>>service = new QuestionRetrievalService(url);
is replaced by
String url = "http://api.stackexchange.com/";
String path = "2.2/search";
String search = "javafx";
Service<ObservableList<Question>>service = new QuestionRetrievalService(url, path, search);
The hostname, path, and search parameter are used to create a JAX-RS WebTarget:
Client client = ClientBuilder.newClient();
WebTarget target = client.target(loc).path(path).queryParam("tagged", search)
        .queryParam("site", "stackoverflow");
On this WebResource, we can call the request method to execute the request, followed by the get(Class clazz) method, and supply a class parameter. The result of the REST call will then be parsed into an instance of the supplied class, which is also what we did using JAXB in our example in Listing 11-11.
QuestionResponse response = target.request(MediaType.APPLICATION_JSON).get(QuestionResponse.class);The response now contains a list of Questions, and we can use the exact same code as in Listing 11-4 to render the questions.