public class StageCoachMain extends Application {

    StringProperty title = new SimpleStringProperty();

    Text textStageX;
    Text textStageY;
    Text textStageW;
    Text textStageH;
    Text textStageF;
    CheckBox checkBoxResizable;
    CheckBox checkBoxFullScreen;

    double dragAnchorX;
    double dragAnchorY;

    public static void main(String[] args) {
        Application.launch(args);
    }

    @Override
    public void start(Stage stage) {
        StageStyle stageStyle = StageStyle.DECORATED;
        List<String> unnamedParams = getParameters().getUnnamed();
        if (unnamedParams.size() > 0) {
            String stageStyleParam = unnamedParams.get(0);
            if (stageStyleParam.equalsIgnoreCase("transparent")) {
                stageStyle = StageStyle.TRANSPARENT;
            } else if (stageStyleParam.equalsIgnoreCase("undecorated")) {
                stageStyle = StageStyle.UNDECORATED;
            } else if (stageStyleParam.equalsIgnoreCase("utility")) {
                stageStyle = StageStyle.UTILITY;
            }
        }
        final Stage stageRef = stage;
        Group rootGroup;
        TextField titleTextField;
        Button toBackButton = new Button("toBack()");
        toBackButton.setOnAction(e -> stageRef.toBack());
        Button toFrontButton = new Button("toFront()");
        toFrontButton.setOnAction(e -> stageRef.toFront());
        Button closeButton = new Button("close()");
        closeButton.setOnAction(e -> stageRef.close());
        Rectangle blue = new Rectangle(250, 350, Color.SKYBLUE);
        blue.setArcHeight(50);
        blue.setArcWidth(50);
        textStageX = new Text();
        textStageX.setTextOrigin(VPos.TOP);
        textStageY = new Text();
        textStageY.setTextOrigin(VPos.TOP);
        textStageH = new Text();
        textStageH.setTextOrigin(VPos.TOP);
        textStageW = new Text();
        textStageW.setTextOrigin(VPos.TOP);
        textStageF = new Text();
        textStageF.setTextOrigin(VPos.TOP);
        checkBoxResizable = new CheckBox("resizable");
        checkBoxResizable.setDisable(stageStyle == StageStyle.TRANSPARENT
                || stageStyle == StageStyle.UNDECORATED);
        checkBoxFullScreen = new CheckBox("fullScreen");
        titleTextField = new TextField("Stage Coach");
        Label titleLabel = new Label("title");
        HBox titleBox = new HBox(titleLabel, titleTextField);
        VBox contentBox = new VBox(
                textStageX, textStageY, textStageW, textStageH, textStageF,
                checkBoxResizable, checkBoxFullScreen,
                titleBox, toBackButton, toFrontButton, closeButton);
        contentBox.setLayoutX(30);
        contentBox.setLayoutY(20);
        contentBox.setSpacing(10);
        rootGroup = new Group(blue, contentBox);

        Scene scene = new Scene(rootGroup, 270, 370);
        scene.setFill(Color.TRANSPARENT);

        //when mouse button is pressed, save the initial position of screen
        rootGroup.setOnMousePressed((MouseEvent me) -> {
            dragAnchorX = me.getScreenX() - stageRef.getX();
            dragAnchorY = me.getScreenY() - stageRef.getY();
        });

        //when screen is dragged, translate it accordingly
        rootGroup.setOnMouseDragged((MouseEvent me) -> {
            stageRef.setX(me.getScreenX() - dragAnchorX);
            stageRef.setY(me.getScreenY() - dragAnchorY);
        });

        textStageX.textProperty().bind(new SimpleStringProperty("x: ")
                .concat(stageRef.xProperty().asString()));
        textStageY.textProperty().bind(new SimpleStringProperty("y: ")
                .concat(stageRef.yProperty().asString()));
        textStageW.textProperty().bind(new SimpleStringProperty("width: ")
                .concat(stageRef.widthProperty().asString()));
        textStageH.textProperty().bind(new SimpleStringProperty("height: ")
                .concat(stageRef.heightProperty().asString()));
        textStageF.textProperty().bind(new SimpleStringProperty("focused: ")
                .concat(stageRef.focusedProperty().asString()));
        stage.setResizable(true);
        checkBoxResizable.selectedProperty()
                .bindBidirectional(stage.resizableProperty());
        checkBoxFullScreen.selectedProperty().addListener((ov, oldValue, newValue) -> {
            stageRef.setFullScreen(checkBoxFullScreen.selectedProperty().getValue());
        });
        title.bind(titleTextField.textProperty());

        stage.setScene(scene);
        stage.titleProperty().bind(title);
        stage.initStyle(stageStyle);
        stage.setOnCloseRequest((WindowEvent we) -> {
            System.out.println("Stage is closing");
        });
        stage.show();
        Rectangle2D primScreenBounds = Screen.getPrimary().getVisualBounds();
        stage.setX((primScreenBounds.getWidth() - stage.getWidth()) / 2);
        stage.setY((primScreenBounds.getHeight() - stage.getHeight()) / 4);
    }
}Setting the Stage
The appearance and functionality of your stage will depend on the platform on which it is deployed. For example, if deployed in an embedded device with a touch screen, your stage might be the whole touch screen. The stage for a JavaFX program deployed via Java Web Start will be a window.
Understanding the Stage Class
The Stage class is the top-level container for any JavaFX program that has a graphical UI. It has several properties and methods that allow it, for example, to be positioned, sized, given a title, made invisible, or given some degree of opacity. The two best ways that we know of to learn the capabilities of a class are to study the JavaFX API documentation and to examine (and write) programs that use it. In this section, we ask you to do both, beginning with looking at the API docs.
The JavaFX API docs may be found in the docs/api directory subordinate to where you installed the JavaFX SDK. Also, they are available online at the URL given in the Resources section at the end of this chapter. Open the index.html file in your browser, navigate to the javafx.stage package, and select the Stage class. That page should contain tables of Properties, Constructors, and Methods, including select ones shown in the excerpt in Figure 2-1.
Figure 2-1. A portion of the Stage class documentation in the JavaFX API
Go ahead and explore the documentation for each of the properties and methods in the Stage class, remembering to click the links to reveal more detailed information. When you’re finished, come back and we’ll show you a program that demonstrates many of the properties and methods available in the Stage class.
Using the Stage Class: The StageCoach Example
A screenshot of the unassuming, purposely ill-fitting StageCoach example program is shown in Figure 2-2.
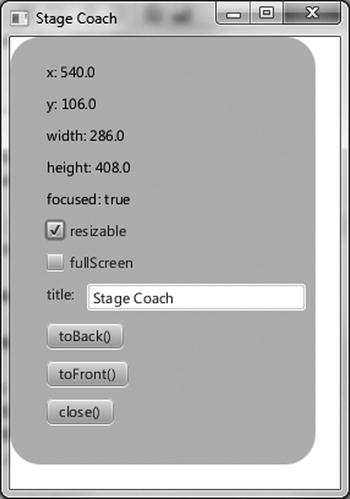
Figure 2-2. A screenshot of the StageCoach example
The StageCoach program was created to coach you through the finer points of using the Stage class and related classes such as StageStyle and Screen. Also, we use this program to show you how to get arguments passed into the program.
Before walking through the behavior of the program, go ahead and open the project and execute it by following the instructions for building and executing the Audio-Config project in Chapter 1. The project file is located in the Chapter02 directory subordinate to where you extracted the book’s code download bundle.
EXAMINING THE BEHAVIOR OF THE STAGECOACH PROGRAM
When the program starts, its appearance should be similar to the screenshot in Figure 2-2. To fully examine its behavior, perform the following steps. Note that for instructional purposes, the property and method names on the UI correspond to the properties and methods in the Stage instance.
-
Notice that the
StageCoachprogram’s window is initially displayed near the top of the screen, with its horizontal position in the center of the screen. Drag the program’s window and observe that the x and y values near the top of the UI are dynamically updated to reflect its position on the screen. -
Resize the program’s window and observe that the width and height values change to reflect the width and height of the Stage. Note that this size includes the decorations (title bar and borders) of the window.
-
Click the program (or cause it to be in focus some other way) and notice that the focused value is true. Cause the window to lose focus, perhaps by clicking somewhere else on the screen, and notice that the focused value becomes false.
-
Clear the resizable check box and then notice that the resizable value becomes false. Then try to resize the window and note that it is not permitted. Select the resizable check box again to make the window resizable.
-
Select the
fullScreencheck box. Notice that the program occupies the full screen and that the window decorations are not visible. Clear thefullScreencheck box to restore the program to its former size. -
Edit the text in the text field beside the
titlelabel, noticing that the text in the window’s title bar is changed to reflect the new value. -
Drag the window to partially cover another window, and click
toBack( ). Notice that this places the program behind the other window, therefore causing the z-order to change. -
With a portion of the program’s window behind another window, but with the toFront( ) button visible, click that button. Notice that the program’s window is placed in front of the other window.
-
Click
close( ), noticing that the program exits. -
Invoke the program again, passing in the string "undecorated". If invoking from NetBeans, use the Project Properties dialog box to pass this argument as shown in Figure 2-3. The "undecorated" string is passed as a parameter without a value.
-
Notice that this time the program appears without any window decorations, but the white background of the program includes the background of the window. The black outline in the screenshot shown in Figure 2-4 is part of the desktop background.
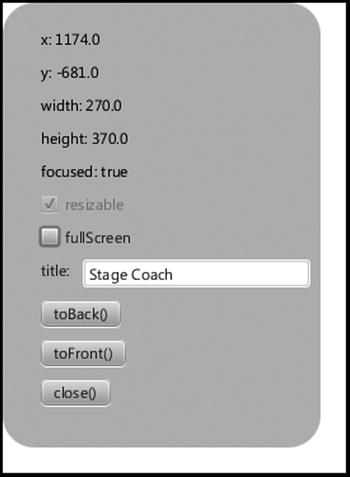
Figure 2-4. The StageCoach program after being invoked with the undecorated argument
-
Exit the program again by clicking
close( ), and then run the program again, passing in the string "transparent" as the argument. Notice that the program appears in the shape of a rounded rectangle, as shown in Figure 2-5.
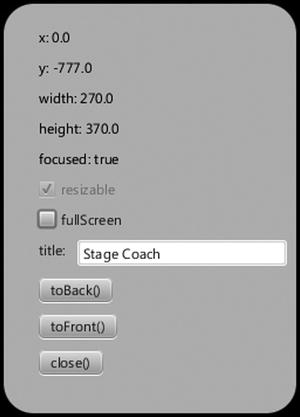
Figure 2-5. The StageCoach program after being invoked with the transparent argument
Note: You might have noticed that the screenshots in Figures 2-4 and 2-5 have y values that are negative. This is because the application was positioned on the secondary monitor, logically above the primary monitor, when the screenshots were taken.
-
Click the application’s UI, drag it around the screen, and click close( ) when finished. Congratulations on sticking with this 13-step exercise! Performing this exercise has prepared you to relate to the code behind it, which we now walk through together.
Understanding the StageCoach Program
Take a look at the code for the StageCoach program in Listing 2-1 before we point out new and relevant concepts.
Listing 2-1. StageCoachMain.java
Obtaining Program Arguments
The first new concept introduced by this program is the ability to read the arguments passed into a JavaFX program. The javafx.application package includes a class named Application that has application life cycle-related methods such as launch(), init(), start(), and stop(). Another method in the Application class is getParameters(), which gives the application access to the arguments passed on the command line, as well as unnamed parameters and <name,value> pairs specified in a JNLP file. Here’s the relevant code snippet from Listing 2-1 for your convenience:
StageStyle stageStyle = StageStyle.DECORATED;
List<String> unnamedParams = getParameters().getUnnamed();
if (unnamedParams.size() > 0) {
  String stageStyleParam = unnamedParams.get(0);
  if (stageStyleParam.equalsIgnoreCase("transparent")) {
    stageStyle = StageStyle.TRANSPARENT;
  }
  else if (stageStyleParam.equalsIgnoreCase("undecorated")) {
    stageStyle = StageStyle.UNDECORATED;
  }
  else if (stageStyleParam.equalsIgnoreCase("utility")) {
    stageStyle = StageStyle.UTILITY;
  }
}
...code omitted...
stage.initStyle(stageStyle);
Setting the Style of the Stage
We’re using the getParameters() method described previously to get an argument that tells us whether the stage style of the Stage instance should be its default (StageStyle.DECORATED), StageStyle.UNDECORATED, or StageStyle.TRANSPARENT. You saw the effects of each in the preceding exercise, specifically in Figures 2-2, 2-4, and 2-5.
Controlling Whether a Stage Is Resizable
As shown in the following excerpt from Listing 2-1, to make this application’s window initially resizable we’re calling the setResizable() method of the Stage instance. To keep the resizable property of the Stage and the state of the resizable check box synchronized, the check box is bidirectionally bound to the resizable property of the
Stage instance.
stage.setResizable(true);
checkBoxResizable.selectedProperty()
.bindBidirectional(stage.resizableProperty());Tip: A property that is bound cannot be explicitly set. In the code preceding the snippet, the resizable property is set with the setResizable() method before the property is bound in the next line.
Making a Stage Full Screen
Making the Stage show in full-screen mode is done by setting the fullScreen property of the Stage instance to true. As shown in the following snippet from Listing 2-1, to keep the fullScreen property of the Stage and the state of the fullScreen check box synchronized, the fullScreen property of the Stage instance is updated whenever the selected property of the checkBox changes.
checkBoxFullScreen.selectedProperty().addListener((ov, oldValue, newValue) -> {
    stageRef.setFullScreen(checkBoxFullScreen.selectedProperty().getValue());
});
Working with the Bounds of the Stage
The bounds of the Stage are represented by its x, y, width, and height properties, the values of which can be changed at will. This is demonstrated in the following snippet from Listing 2-1 where the Stage is placed near the top and centered horizontally on the primary screen after the Stage has been initialized.
Rectangle2D primScreenBounds = Screen.getPrimary().getVisualBounds();
stage.setX((primScreenBounds.getWidth() - stage.getWidth()) / 2);
stage.setY((primScreenBounds.getHeight() - stage.getHeight()) / 4);
We’re using the Screen class of the javafx.stage package to get the dimensions of the primary screen so that the desired position may be calculated.
Note: We intentionally made the Stage in Figure 2-2 larger than the Scene contained within to make the following point. The width and height of a Stage include its decorations (title bar and border), which vary on different platforms. It is therefore usually better to control the width and height of the Scene (we show you how in a bit) and let the Stage conform to that size.
Drawing Rounded Rectangles
As pointed out in Chapter 1, you can put rounded corners on a Rectangle by specifying the arcWidth and arcHeight for the corners. The following snippet from Listing 2-1 draws the sky-blue rounded rectangle that becomes the background for the transparent window example in Figure 2-5.
Rectangle blue = new Rectangle(250, 350, Color.SKYBLUE);
blue.setArcHeight(50);
blue.setArcWidth(50);
In this snippet, we use the three-argument constructor of Rectangle, in which the first two parameters specify the width and the height of the Rectangle. The third parameter defines the fill color of the Rectangle.
As you can detect from this code snippet, rounded rectangles are easily created using the arcWidth(double v) and arcHeight(double v) methods, where the parameter v defines the diameter of the arc.
Dragging the Stage on the Desktop When a Title Bar Isn’t Available
The Stage may be dragged on the desktop using its title bar, but in the case where its StageStyle is UNDECORATED or TRANSPARENT, the title bar isn’t available. To allow dragging in this circumstance, we added the code shown in the following code snippet from Listing 2-1.
//when mouse button is pressed, save the initial position of screen
rootGroup.setOnMousePressed((MouseEvent me) -> {
    dragAnchorX = me.getScreenX() - stageRef.getX();
    dragAnchorY = me.getScreenY() - stageRef.getY();
});

//when screen is dragged, translate it accordingly
rootGroup.setOnMouseDragged((MouseEvent me) -> {
    stageRef.setX(me.getScreenX() - dragAnchorX);
    stageRef.setY(me.getScreenY() - dragAnchorY);
});
Event handlers are covered a little later in the chapter, but as a preview, the lambda expression that is supplied to the onMouseDragged() method is called when the mouse is dragged. As a result, the values of the x and y properties are altered by the number of pixels that the mouse was dragged, which moves the Stage as the mouse is dragged.
Using UI Layout Containers
When developing applications that will be deployed in a cross-platform environment or are internationalized, it is good to use layout containers. One advantage of using layout containers is that when the node sizes change, their visual relationships with each other are predictable. Another advantage is that you don’t have to calculate the location of each node that you place in the UI.
The following snippet from Listing 2-1 shows how the VBox layout class, located in the javafx.scene.layout package, is used to arrange the Text, CheckBox, HBox, and Button nodes in a column. This snippet also shows that layout containers may be nested, as demonstrated by the HBox with the name titleBox that arranges the Label and TextField nodes horizontally. Note that several lines of code are omitted from this snippet to show the layout nesting clearly:
HBox titleBox = new HBox(titleLabel, titleTextField);
VBox contentBox = new VBox(
        textStageX, textStageY, textStageW, textStageH, textStageF,
        checkBoxResizable, checkBoxFullScreen,
        titleBox, toBackButton, toFrontButton, closeButton);
The VBox layout class is similar to the Group class discussed in the Hello Earthrise example in Chapter 1, in that it contains a collection of nodes within it. Unlike the Group class, the VBox class arranges its contained nodes vertically, spacing them apart from each other by the number of pixels specified in the spacing property.
Ascertaining Whether the Stage Is in Focus
To know whether your JavaFX application is the one that currently is in focus (e.g., keys pressed are delivered to the application), simply consult the focused property of the Stage instance. The following snippet from Listing 2-1 demonstrates this.
textStageF.textProperty().bind(new SimpleStringProperty("focused: ")
        .concat(stageRef.focusedProperty().asString()));
Controlling the Z-Order of the Stage
In the event that you want your JavaFX application to appear on top of other windows or behind other windows onscreen, you can use the toFront() and toBack() methods, respectively. The following snippet from Listing 2-1 shows how this is accomplished.
Button toBackButton = new Button("toBack()");
toBackButton.setOnAction(e -> stageRef.toBack());
Button toFrontButton = new Button("toFront()");
toFrontButton.setOnAction(e -> stageRef.toFront());
Once again, note how using lambda expressions enhances the readability of the code. It is clear from the first line of the snippet that a Button named toBackButton is created with a text toBack() being displayed on the button. The second line defines that when an action is performed on the button (i.e., the button is clicked), the stage is sent to the back.
Without using a lambda expression, the second line would be replaced by a call to an anonymous inner class as follows:
toBackButton.setOnAction(new EventHandler<javafx.event.ActionEvent>() {
  @Override public void handle(javafx.event.ActionEvent e) {
    stageRef.toBack();
  }
})
This approach not only requires more code, it doesn’t allow the Java runtime to optimize calls and it is much less readable.
Closing the Stage and Detecting When It Is Closed
As shown in the following code snippet from Listing 2-1, you can programmatically close the Stage with its close() method. This is important when the stageStyle is undecorated or transparent, because the close button supplied by the windowing system is not present.
Button closeButton = new Button("close()");
closeButton.setOnAction(e -> stageRef.close());
By the way, you can detect when there is an external request to close the Stage by using the onCloseRequest event handler as shown in the following code snippet from Listing 2-1.
stage.setOnCloseRequest((WindowEvent we) -> {
        System.out.println("Stage is closing");
});
To see this in action, run the application without any arguments so that it has the appearance of Figure 2-2 shown previously, and then click the close button on the decoration of the window.
Tip: The onCloseRequest event handler is only called when there is an external request to close the window. This is why the “Stage is closing” message doesn’t appear in this example when you click the button labeled close( ).