stage.setScene(scene);
stage.setTitle("Hello Earthrise");
stage.show();A Stage and a Scene
Stage는 어디에 전개되든지 간에 자바FX 앱의 UI를 포함한다. 예를 들어 데스크탑에서는 Stage는 자신의 탑레벨 윈도우를 갖는다.
최초의 stage는 런타임이 만들며 start()메소드에 건네진다. Stage클래스는 여러가지 속성을 갖는다.
-
UI의 그래픽 노드를 포함하는 scene
-
윈도우 타이틀
-
Stage의 보이기
Scene은 JavaFX scene 그래프의 최상위 컨테이너이다. Stage에 표시된 그래픽 요소들을 담고 있다. Scene의 모든 요소는 그래픽 노드이다. scene 그래프는 Scene의 계층적 표현이다. 이 그래프의 요소들은 자식 요소를 가질 수 있으며 이 들 모두는 Node클래스의 인스턴스이다.
The Scene class contains a number of properties, such as its width and height. A Scene also has a property named root that holds the graphical elements that are displayed in the Scene, in this case a Group instance that contains an ImageView instance (which displays an image) and a Group instance. Nested within the latter Group is a Text instance (which is a graphical element, usually called a graphical node, or simply node).
Scene의 루트 속성에는 Group클래스를 담고 있다. 루트 속성은 Node의 어떻한 하위클래스의 인스턴스도 담을 수 있으며 특히 Node 인스턴스 자신을 담을 수 있는 인스턴스를 포함할 수 있다.
Take a look at the JavaFX API documentation that we showed you how to access in the “Use the Official Specifications” section earlier and check out the Node class to see the properties and methods available to any graphical node. Also, take a look at the ImageView class in the javafx.scene.image package and the Group class in the javafx.scene package. In both cases, they inherit from the Node class.
Tip We can’t emphasize enough the importance of having the JavaFX API documentation handy while reading this book. As classes, variables, and functions are mentioned, it’s a good idea to look at the documentation to get more information. In addition, this habit helps you become more familiar with what is available to you in the API.
Displaying Images
As shown in the following code, displaying an image entails using an ImageView instance in conjunction with an Image instance.
Image image = new Image ("http://projavafx.com/images/earthrise.jpg");
ImageView imageView = new ImageView(image);
The Image instance identifies the image resource and loads it from the URL assigned to its URL variable. Both of these classes are located in the
javafx.scene.image package.
Displaying Text
In the example, we created a Text Node as follows:
Text textRef = new Text(message);If you consult the JavaFX API documentation, you will notice that a Text instance, contained in package javafx.scene.text, extends a Shape that extends a Node. As a consequence, a Text instance is a Node as well, and all the properties on Node apply on Text as well. Moreover, Text instances can be used in the scene graph the same way other nodes are used.
As you can detect from the example, a Text instance contains a number of properties that can be modified. Most of the properties are self-explanatory, but again, it is always useful to consult the JavaFX API documentation when manipulating objects.
Because all graphical elements in JavaFX directly or indirectly extend the Node class, and because the Node class already contains many useful properties, the amount of properties on a specific graphical element such as Text can be rather high.
In our example, we set a limited number of properties that we briefly explain next.
The method
textRef.setLayoutY(100)applies a vertical translation of 100 pixels to the Text content.
The fill method is used to specify the color of the text.
While you’re looking at the javafx.scene.text package in the API documentation, take a look at the font function of the Font class, which is used to define the font family, weight, and size of the Text.
The textOrigin property specifies how the text is aligned with its area.
Referring again to the JavaFX API documentation, notice that the VPos enum (in the javafx.geometry package) has fields that serve as constants, for example, BASELINE, BOTTOM, and TOP. These control the origin of the text with respect to vertical locations on the displayed `Tex`t:
-
The
TOPorigin, as we’re using it in the previous code snippet, places the top of the text (including ascenders) at the layoutY position, relative to the coordinate space in which theTextis located. -
The
BOTTOMorigin would place the bottom of the text, including descenders (located in a lowercaseg, for example) at thelayoutYposition. -
The
BASELINEorigin would place the baseline of the text (excluding descenders) at thelayoutYposition. This is the default value for thetextOriginproperty of a Text instance.
The wrappingWidth property enables you to specify at what number of pixels the text will wrap.
he textAlignment property enables you to control how the text will be justified. In our example, TextAlignment.JUSTIFY aligns the text on both the left and right sides, expanding the space between words to achieve that.
The text that we’re displaying is sufficiently long to wrap and be drawn on the Earth, so we need to define a rectangular region outside of which that text cannot be seen.
Tip We recommend you modify some of the values, recompile the example, and run it again. This will help you understanding how the different properties work. Alternatively, by using ScenicView you can inspect and modify the different properties at runtime.
Working with Graphical Nodes as a Group
One powerful graphical feature of JavaFX is the ability to create scene graphs, which consist of a tree of graphical nodes. You can then assign values to properties of a Group located in the hierarchy, and the nodes contained in the Group will be affected. In our current example from Listing 1-1, we’re using a Group to contain a Text node and to clip a specific rectangular region within the Group so that the text doesn’t appear on the moon or the Earth as it animates upward. Here’s the relevant code snippet:
Group textGroup = new Group(textRef);
textGroup.setLayoutX(50);
textGroup.setLayoutY(180);
textGroup.setClip(new Rectangle(430, 85));
Notice that the Group is located 50 pixels to the right and 180 pixels down from where it would have been located by default. This is due to the values assigned to the layoutX and layoutY variables of the Group instance. Because this Group is contained directly by the Scene, its upper-left corner’s location is 50 pixels to the right and 180 pixels down from the upper-left corner of the Scene. Take a look at Figure 1-5 to see this example illustrated as you read the rest of the explanation.
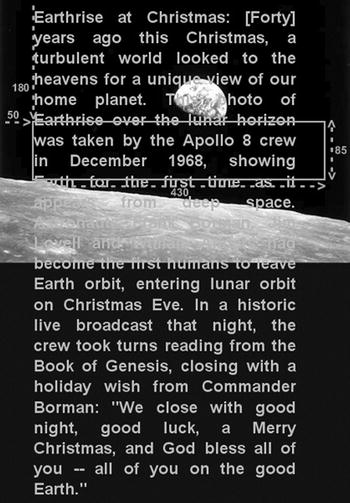
Figure 1-5. The Scene, Group, Text, and clip illustrated
A Group instance contains instances of Node subclasses by assigning a collection of them to itself via the children() method. In the previous code snippet, the Group contains a Text instance that has a value assigned to its layoutY property. Because this Text is contained by a Group, it assumes the two-dimensional space (also called the coordinate space) of the Group, with the origin of the Text node (0,0) coincident with the top-left corner of the Group. Assigning a value of 100 to the layoutY property causes the Text to be located 100 pixels down from the top of the Group, which is just below the bottom of the clip region, thus causing it to be out of view until the animation begins. Because a value isn’t assigned to the layoutX variable, its value is 0 (the default).
The layoutX and layoutY properties of the Group just described are examples of our earlier statement that nodes contained in a Group will be affected by values assigned to properties of the Group. Another example is setting the opacity property of a Group instance to 0.5, which causes all of the nodes contained in that Group to become translucent.
If the JavaFX API documentation is handy, look at the properties available in the javafx.scene.Group class. Then look at the properties available in the javafx.scene.Node class properties, which is where you’ll find the layoutX, layoutY, and opacity variables that are inherited by the Group class.
Clipping Graphical Areas
To define a clipping area, we assign a Node subclass to the clip property that defines the clipping shape, in this case a Rectangle that is 430 pixels wide and 85 pixels high. In addition to keeping the Text from covering the moon, when the Text scrolls up as a result of animation, the clipping area keeps the Text from covering the earth.
Animating the Text to Make It Scroll Up
When the HelloEarthrise program is invoked, the Text begins scrolling up slowly. To achieve this animation, we’re using the TranslateTransition class located in the javafx.animation package, as shown in the following snippet from Listing 1-1.
TranslateTransition transTransition = new TranslateTransition(new Duration(75000), textRef);
transTransition.setToY(-820);
transTransition.setInterpolator(Interpolator.LINEAR);
transTransition.setCycleCount(Timeline.INDEFINITE);

...code omitted...

// Start the text animation
transTransition.play();
The javafx.animation package contains convenience classes for animating nodes. This TranslateTransition instance translates the Text node referenced by the textRef variable from its original Y position of 100 pixels to a Y position of –820 pixels, over a duration of 75 seconds. The Interpolator.LINEAR constant is assigned to the interpolator property, which causes the animation to proceed in a linear fashion. A look at the API docs for the Interpolator class in the javafx.animation package reveals that there are other forms of interpolation available, one of which is EASE_OUT, which slows down the animation toward the end of the specified duration.
Note Interpolation in this context is the process of calculating the value at any point in time, given a beginning value, an ending value, and a duration.
The last line in the previous snippet begins executing the play method of the TranslateTransition instance created earlier in the program. This makes the Text begin scrolling upward. Because of the value assigned to the cycleCount variable, this transition will repeat indefinitely.